Today I’m going to walk through a multi-faceted Dodeca example that shows off several different concepts and techniques. We tend to conceptualize Dodeca applications and solutions in terms of making Essbase even better and today’s example is a perfect example of how we do that.
Think about it this way: your organization spends an enormous amount of time designing the perfect cube – the proper dimensionality, formulae, calc scripts, data, and more. Often, the cube serves multiple units or departments and they each have their preferred way of looking at things: hierarchies, views, and more. On the developer/Essbase side of things the functionality is solid and feature-rich. But there may be compromises on the user/interface side of things. This is where Dodeca and the example I’m walking through today really shine. It’s a practical example of how Dodeca can make Essbase better by creating a highly focused and tailored experience for the user.
Dynamic Build Use Case
Today’s use case will combine multiple techniques, but the core use case in play here is that we would like to allow the user to select multiple items from a certain level of a dimension, then dynamically build a report with those selections as well as the immediate children of those selections. As an extra twist, there are some “dummy” input members that we need to dynamically filter out so that we don’t bother the user with some extra clutter. Here’s an example of the resulting view:
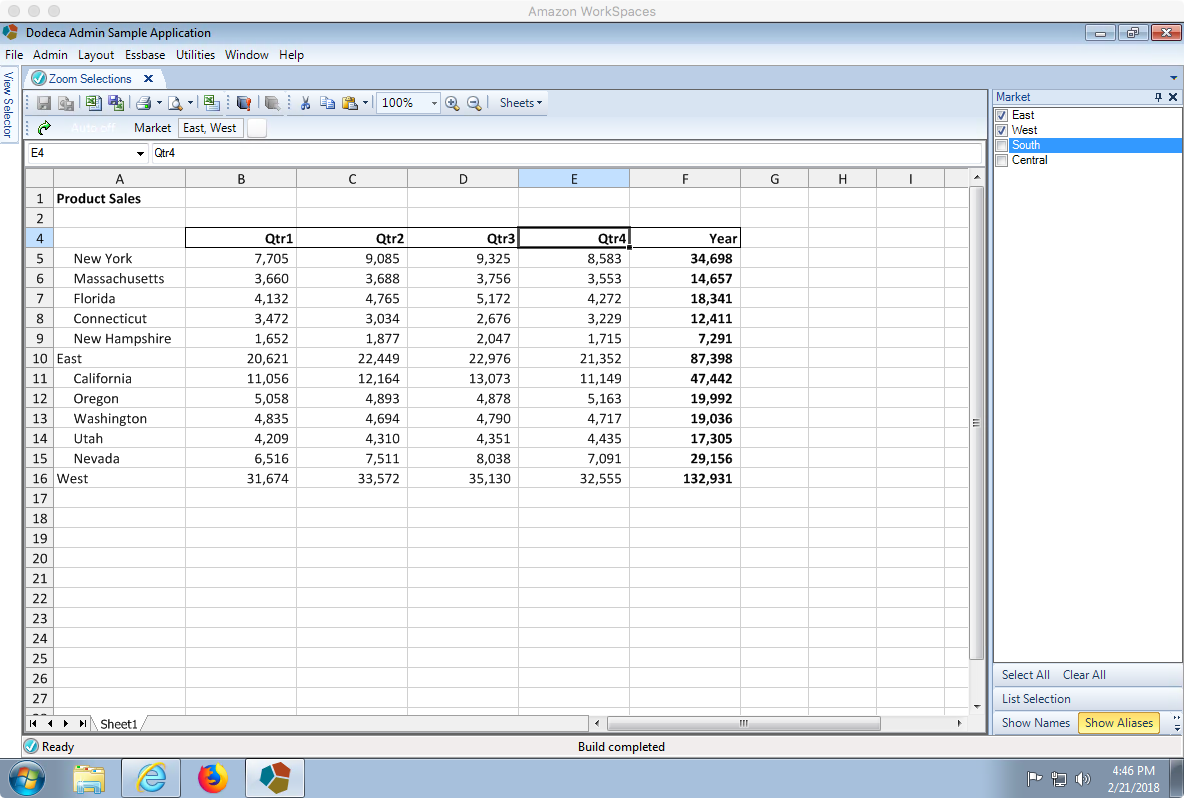
An example of a dynamic build based on custom selections
This example is built around the classic Sample/Basic cube that you’re likely familiar with. In terms of the user experience, we have a dynamically built selector list (on the right side, showing markets) that will use an MDX script to populate the selections directly from the outline. When the user goes to build with these selections, we will also dynamically build the report to include those selections and their children.
To briefly focus on the user experience and to some extent the developer experience, I want to really hammer the point home about the selector list. One, we’re not relegated to just showing the entire dimension and effectively sending a message to the user “Hey, go on a treasure hunt and find what you need” – we’ve completely focused the selector list to the relevant choices the user can make for this view (the upper level regions in the Market dimension). Secondly, it’s a dynamic list, so when the outline is updated, we’re automatically in sync with it, with no additional maintenance needed. This keeps things very maintainable on the development/administration side of things.
Before we dive in completely, let me point out some additional members I added to this outline to help show off this technique. Underneath each major region, there is now an input member:
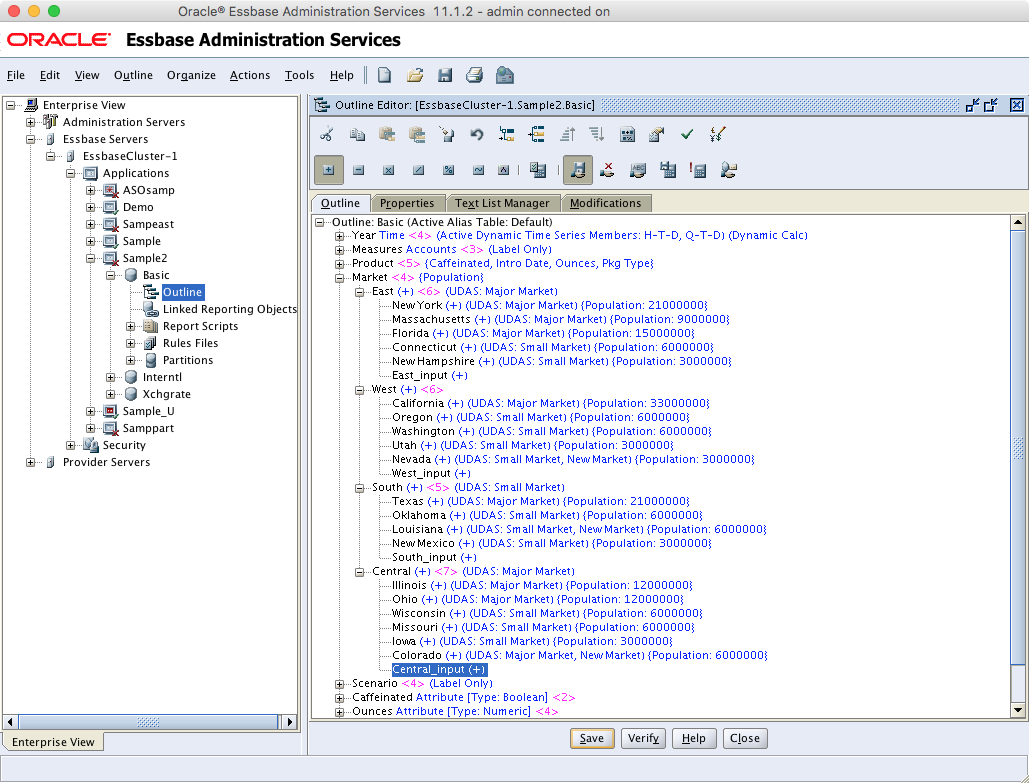
Outline with a twist: additional level-0 input members for regional budgeting
This is a fairly common use case where budgeting or some other activity needs to be done at a region/aggregate level, but the best practice of inputting at level-0 is being adhered to. Therefore, some budget members (East_input, West_input, etc.) are created at level-0. Some organizations don’t want to clutter up the outline and will have a “house rule” that the first or last member underneath a region might serve as the “budgeting bucket”, but my preference is for the dedicated members (you can make the case that it’s cleaner, among other things).
Setting up the template
The template for this example is pretty straightforward. The main thing we need to do are to set the named range for the Essbase data retrieve area, and then designate a starting cell for where the markets will be dynamically placed on the report.
Here’s the template with the Essbase retrieve range highlighted (note that there is a hidden row at row 3 that contains the scenario, product, and other dimensions that are essentially part of the POV):
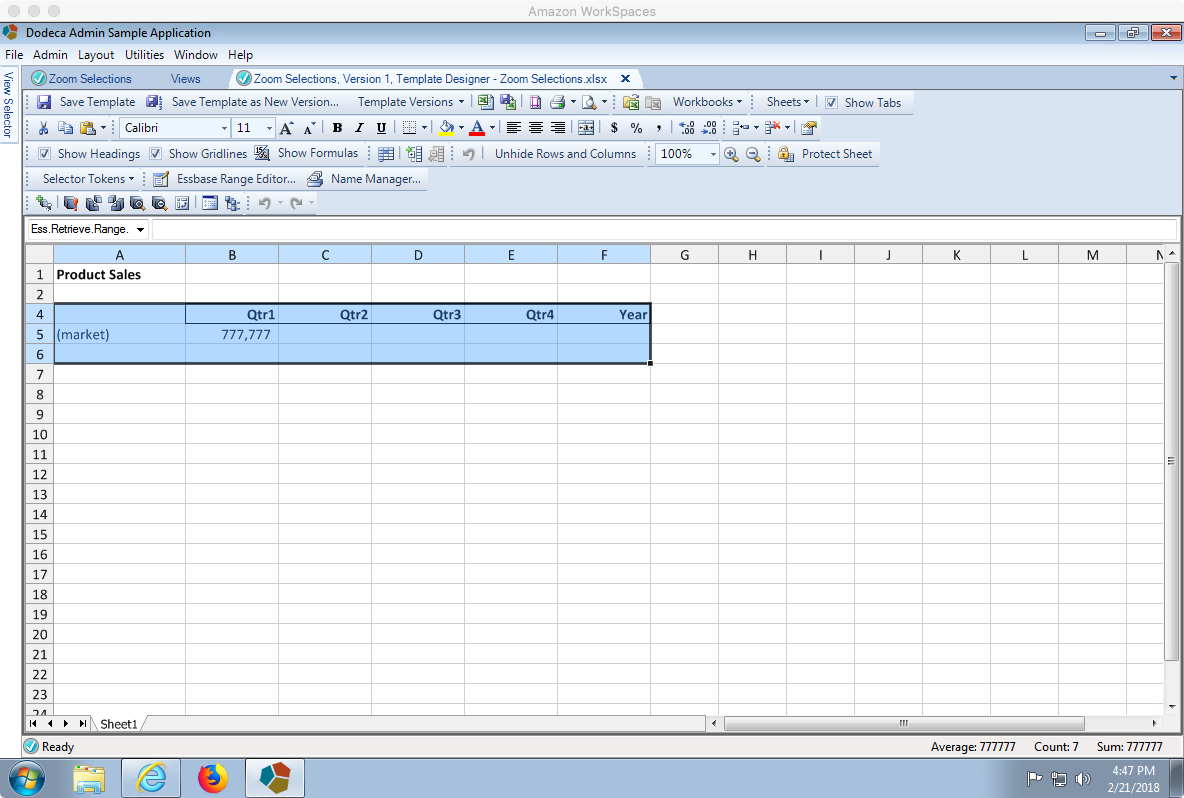
The nominal Essbase retrieve range in the view template
There’s nothing special about the (market) text in cell A5. It’s basically just a note to myself that it’s the location where the markets will be dynamically placed onto the template prior to the Essbase retrieve occurring. It’ll be overwritten when member names are placed in.
Next, I am going to define a named range/cell named StartCell. There’s nothing special about this particular name. This named cell will give me an easy way to refer to it from the workbook script we’ll be building in a moment. I’ll want to be able to tell the workbook script exactly where to start loading selections onto the spreadsheet:
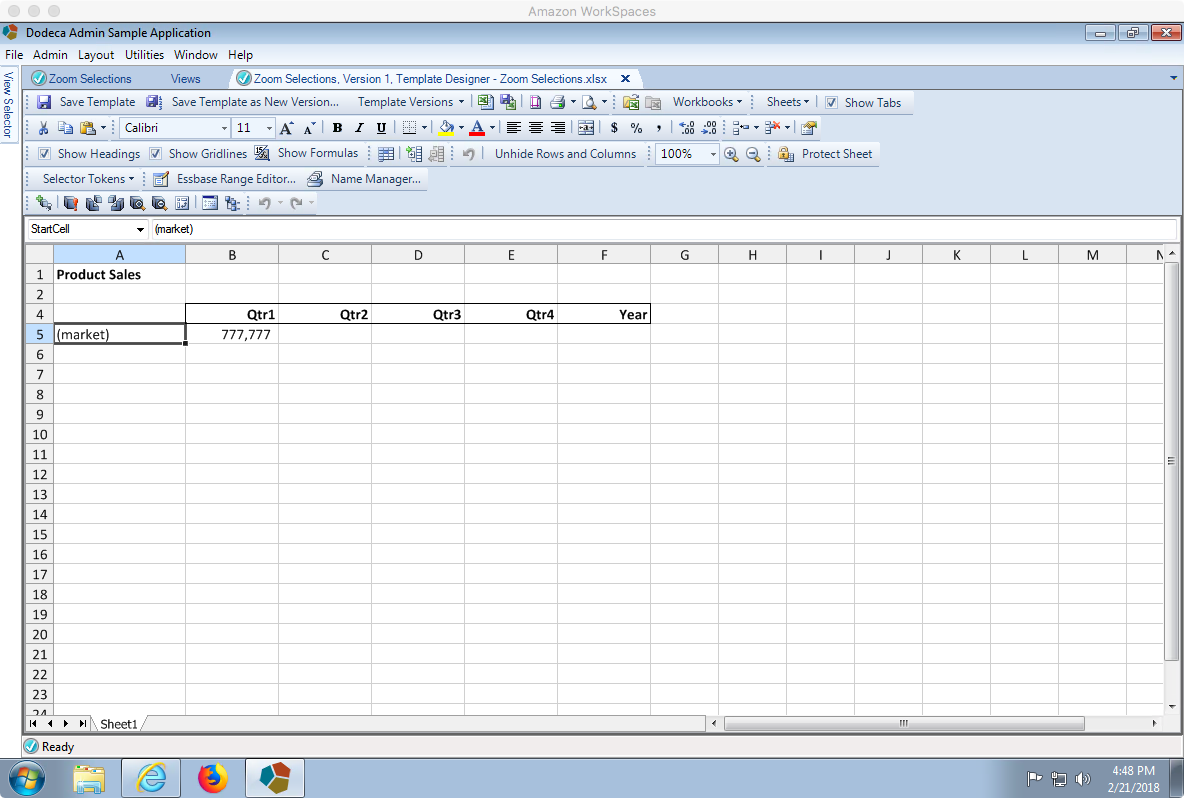
The named StartCell will serve as a starting location for a range build script
Other than that, I have just performed some incredibly light formatting on the rest of the template in terms of bolding some text, setting commas to display for numbers, and some cell borders. Once the view is functioning as expected I can go back into the template and pretty things up.
Configuring the view
With the template configured, it’s time to go set some of the options on the view itself. The view options here are fairly straightforward, with a couple of key options to set. First, notice AutoAddRetrieveSubRanges and RetrievePolicy:
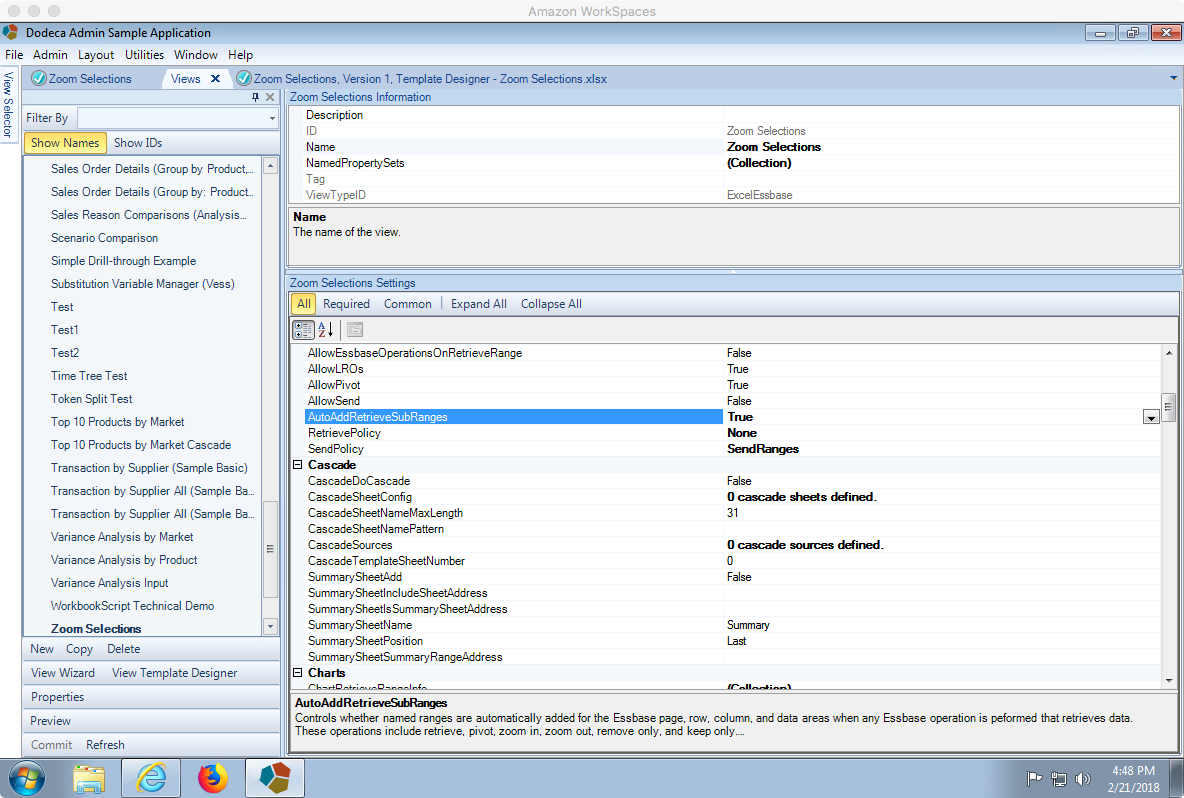
View options, including AutoAddRetrieveSubRanges set to true
I’ve talked about AutoAddRetrieveSubRanges before. It’s an incredibly handy option that automatically creates named ranges for various parts of the Essbase retrieve, including the row members, column members, data region, and POV header. This is really handy and powerful because we can then refer to those names in workbook scripts, as we’ll do in the last step of the workbook script in this example.
Also notice that the RetrievePolicy is set to None. This is kind of uncommon actually. Typically the RetrievePolicy is used to define how Dodeca should perform retrieves on the view – should it just retrieve the entire sheet, the specially named ranges, or nothing at all? As it turns out, this is an instance where we can simply say None, as in don’t perform the retrieve at all. This is because in this particular example, we are going to script an EssbaseZoomIn action and this will actually bring in the data from Essbase for us. So, we can turn retrieving off in the view itself.
The only other thing worth noting on the view properties is that we have a single selector set that allows multiple selections (exact selector list configuration coming up in a moment), and of course the view has a workbook script set, which we’ll get to next.
Workbook Script
As with so many views in Dodeca, a lot of the magic in showing and formatting our Essbase and other data exactly how we want and in a format most conducive to how our user wants to operate is accomplished with a workbook script. Workbook scripts let us add very sophisticated behavior to a view and activate it as needed, such as when the view is opened, built, the user submits data, or one of more than 100 other events in the view lifecycle.
Script Overview
The workbook script in this example is fairly straightforward. All of the methods occur in a single event (after the view is opened but before it’s built). Altogether we have the one event that calls the one procedure, and the one procedure has four methods that run in order. You can see all of this here:
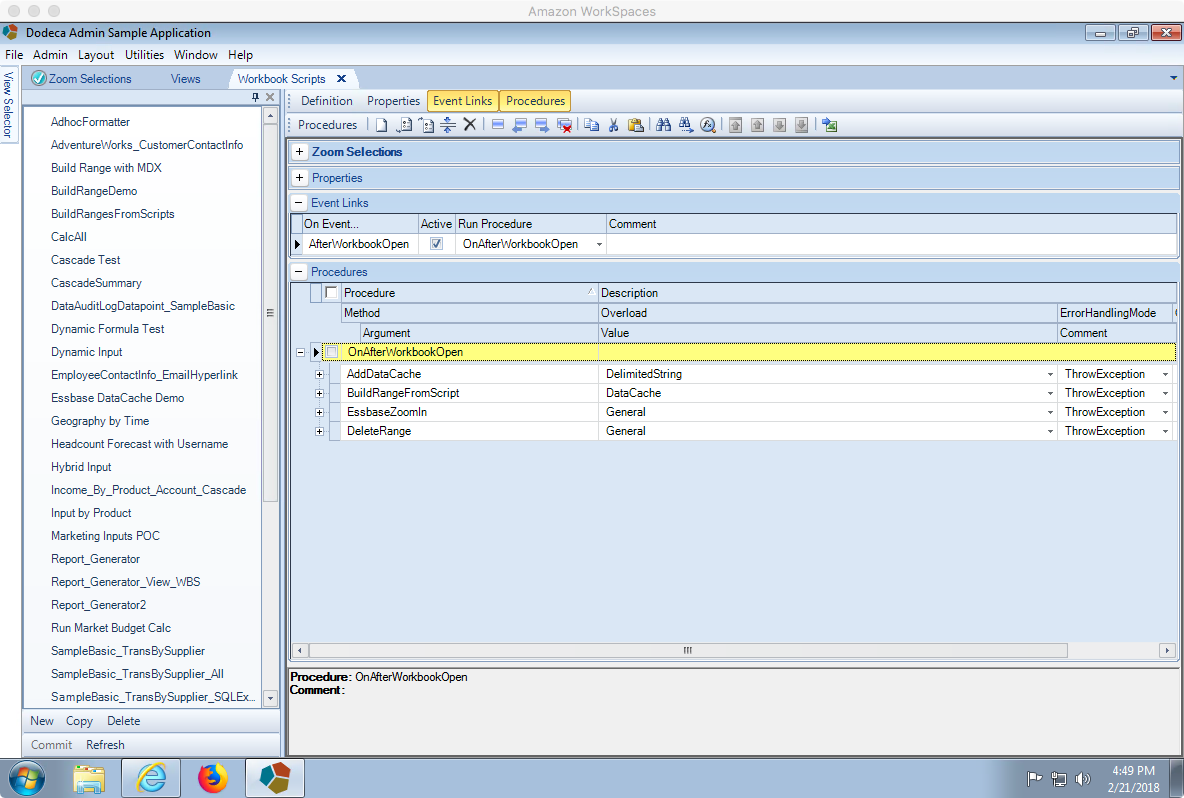
Overview of workbook script event links and all methods for this example
Let’s talk for a moment about the sequence of things in terms of building this view based on user inputs. The user will make one or more selections from the selector list, such as the members East and West. We need to use these as the basis of our template, so we need to somehow take those selections and place them into the spreadsheet. We’ll use the AddDataCache and BuildRangeFromScript procedures for this. Next, we’ll perform an Essbase zoom-in on these members, just as if the user had selected these members and done an zoom-in operation in Excel (except that it’s automated here). Lastly, per the needs of this view, we’ll process the zoomed-in members to remove some that we don’t want to show.
Step 1 – AddDataCache
The first thing we need to do is take the selections the user made in the selector and then process them into a list. Interestingly, this step itself don’t actually affect the template yet, it’s just putting some data into memory that we can use in the next step. I have this step configured as follows:
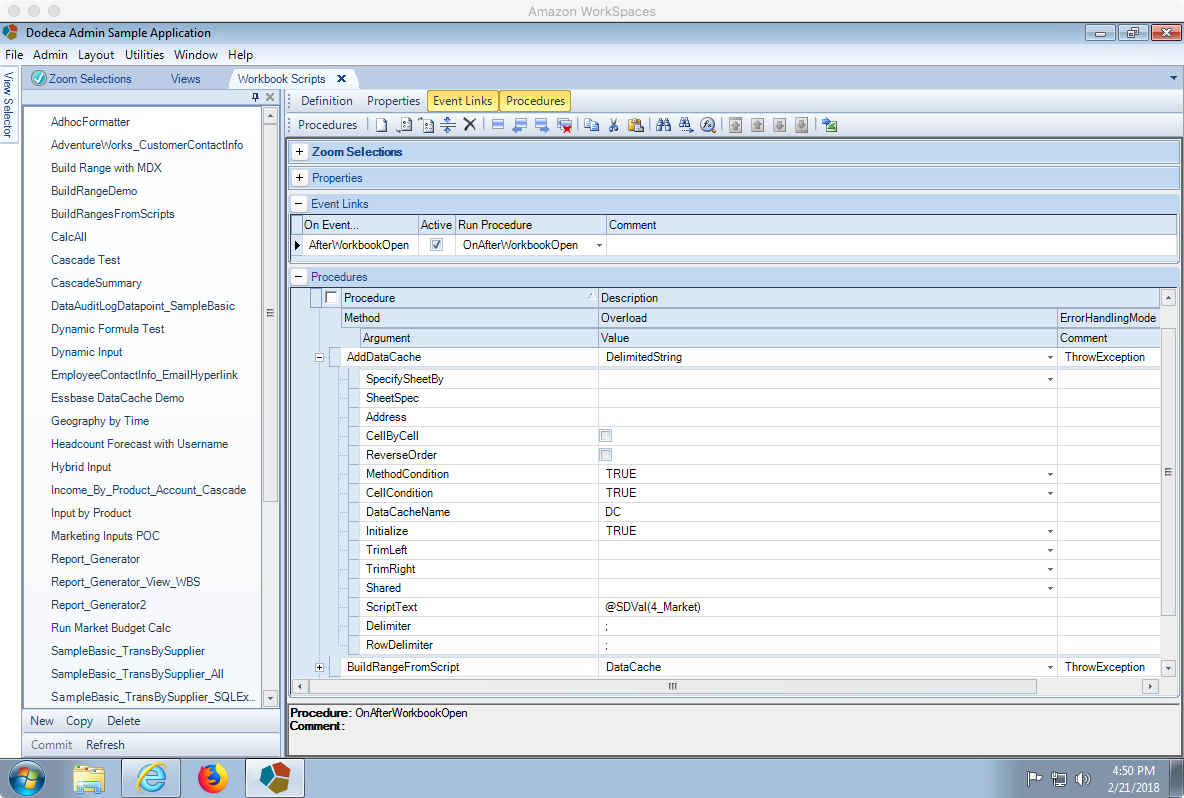
AddDataCache Workbook script to use selector values to build a cache/list of values to process in next step
One thing to keep in mind regarding the multiple selections the user may make is that based on how this selector list is configured, those selections will actually be concatenated together into single string, such as “East;West“. So we’re effectively using this AddDataCache method to split the string up (using a semi-colon as the delimiter) and add it to an internal data cache named DC that will exist for the duration of this view. The ScriptText value is the text that will be split up into the data cache. We’ll use the @SDVal WBS function to get the text value of the selector with the given ID. In other words, if the selector on the view currently has East and West selected, then this function evaluates to East;West. This can be different if the selector list is specifically configured to concatenate items with something other than semi-colon, so keep that in mind.
Step 2 – BuildRangeFromScript
With the data cache successfully populated, we can now move on to the BuildRangeFromScript method to process it. We’ll specifically be using the DataCache variant (“overload”) of this method in order to process the list of items in a data cache and display those on the template. Here’s the configuration for this method:
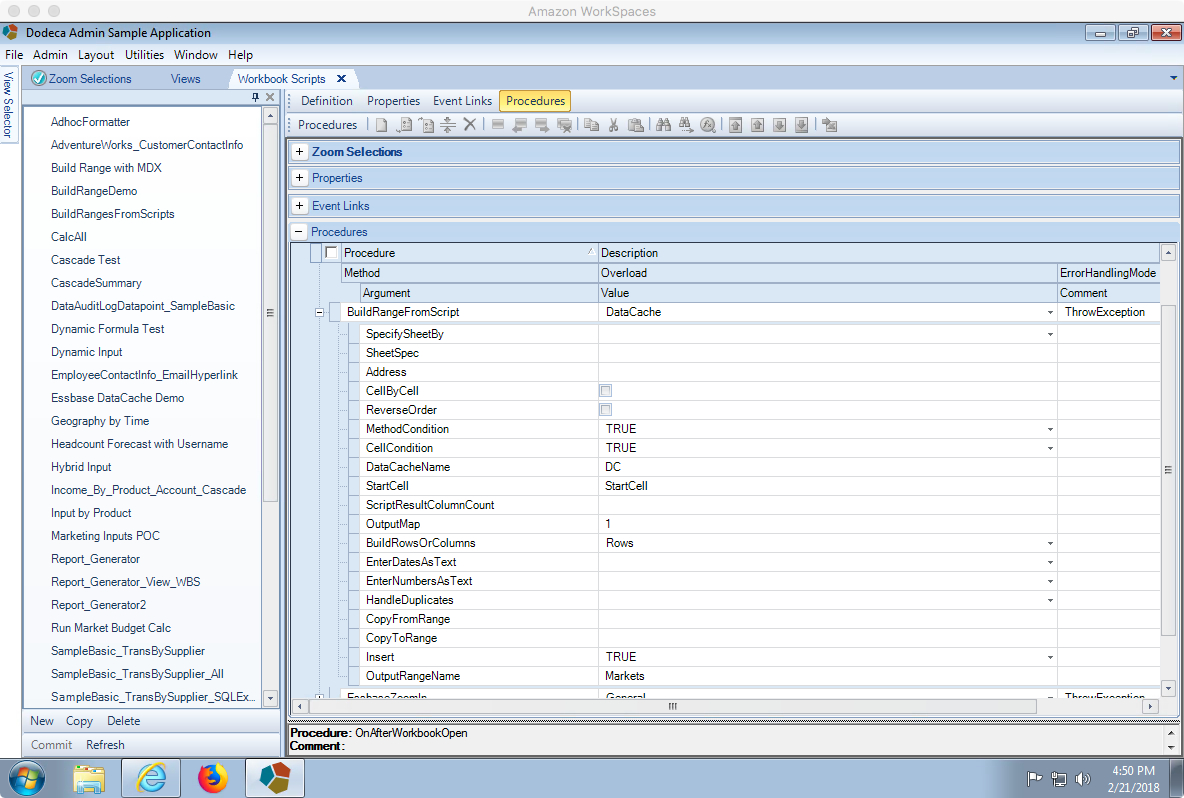
Workbook Script BuildRangeFromScript method using DataCache overload
Generally speaking, the BuildRangeFromScript (“BRFS”) family of methods are absolute work horses are far as Dodeca views go. They are one of the most commonly used techniques to take data such as member selections, outline data, and more and arranging it on a sheet. Since we are using the DataCache variant, we have some properties specific to method that we need to set, as well as some general properties:
- DataCacheName: the name of the data cache to process and put onto the spreadsheet somewhere. This is set to DC, the name we set in the previous step
- StartCell: this is the starting location we set in the template by setting its name. Technically we could make an absolute cell reference here but the best practice is to use a named range, as improves maintenance and readability
- OutputMap: the output map probably warrants an article of its own, but for now just set this to 1, which will work just fine in this “single column” example.
- BuildRowsOrColumns: the BRFS is flexible enough to lay things out along rows or columns. Set this to Rows because this is what we want to build.
- Insert: set to True. By setting this to true, it means that when each item from the data cache is being added to the spreadsheet, it will technically be added by inserting a new row and adding it, as opposed to just just dumping them on the spreadsheet. This is useful for a couple of reasons. The thing that’s most important to us here is that it’ll cause the area covered by Ess.Retrieve.Range.1 to be expanded as the member names are inserted, so we’ll still be able to do a normal Essbase retrieve afterward.
- OutputRangeName: once the BRFS runs, it can optionally create a named range around all of the data that was output onto the spreadsheet. We’ll set this to Markets because having a named range will make our next step very simple
Step 3 – EssbaseZoomIn
At this point we should have an Essbase retrieve range that is populated with the selections that the user made (a screenshot of this intermediate step will be shown in the next section when we walk through the workbook script step by step). With those members now properly laid out, we can now perform the zoom-in step on the entire range using the EssbaseZoomIn method. This is where the OutputRangeName from the previous step comes into play and makes things easy for us.
Here’s the configuration for this method:
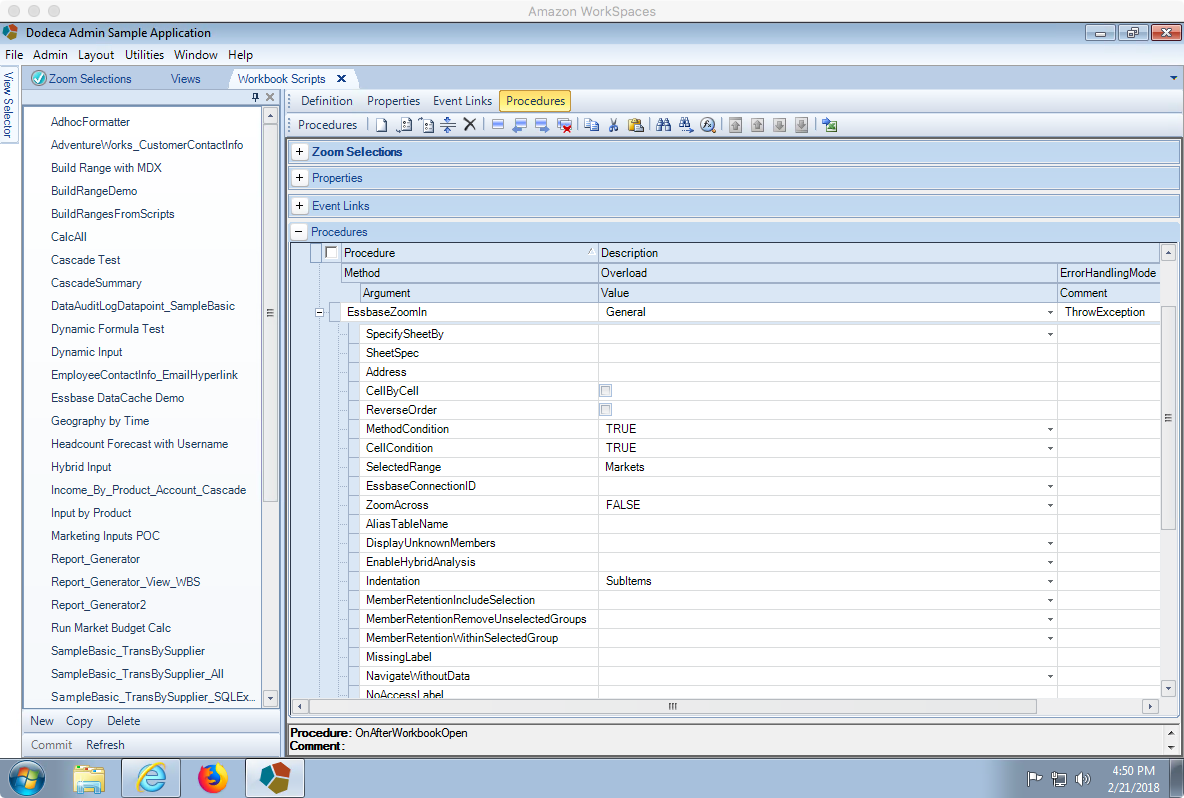
WBS to perform an Essbase zoom in
There are a couple of properties that didn’t show in the previous screenshot, here’s the rest:
The rest of the zoom in method, showing a zoom level of Next
The key properties here are the following:
- SelectedRange: a range name to zoom in on. We’ll use the range that was automatically created for us in the previous step, so it’s effectively like we’re performing a zoom-in on multiple items. I wanted to put a little extra emphasis on this because probably the much more common zoom operation is to just zoom-in (such as double clicking) on a single item.
- Indentation: this isn’t really a critical setting in this context, but I thought it’d be nice to just use the indentation setting to show that this is, indeed, almost exactly like performing a normal zoom operation, including how the resulting data should be formatted (in terms of classic ad hoc options).
- ZoomLevel: Next. As with the previous setting, we have immense control over the exact mechanics of the zoom, including what level to zoom to, which in this case should be next (as opposed to bottom or siblings).
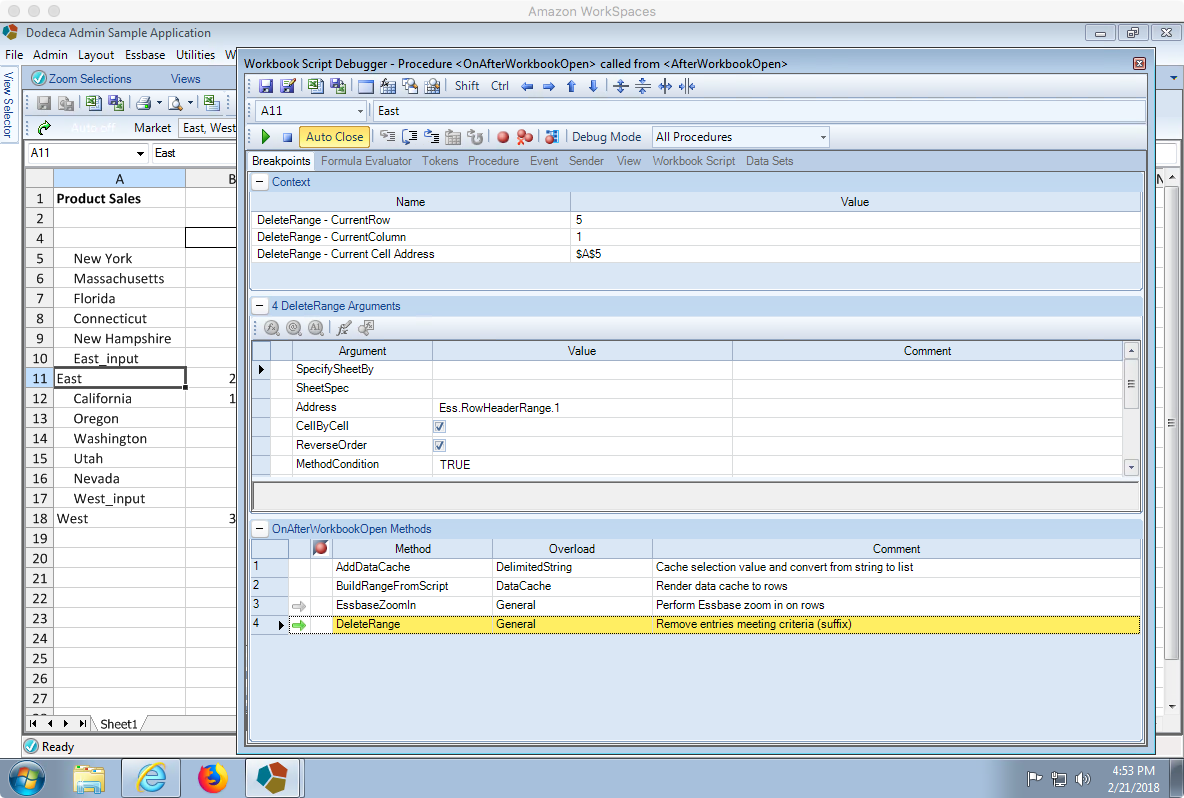
Step 4 – DeleteRange
The last step in the overall procedure is to remove some items that we don’t want to show. We can use the DeleteRange method for this purpose. This really isn’t anything to do with Essbase per se, just a normal spreadsheet operation. Here’s the configuration:
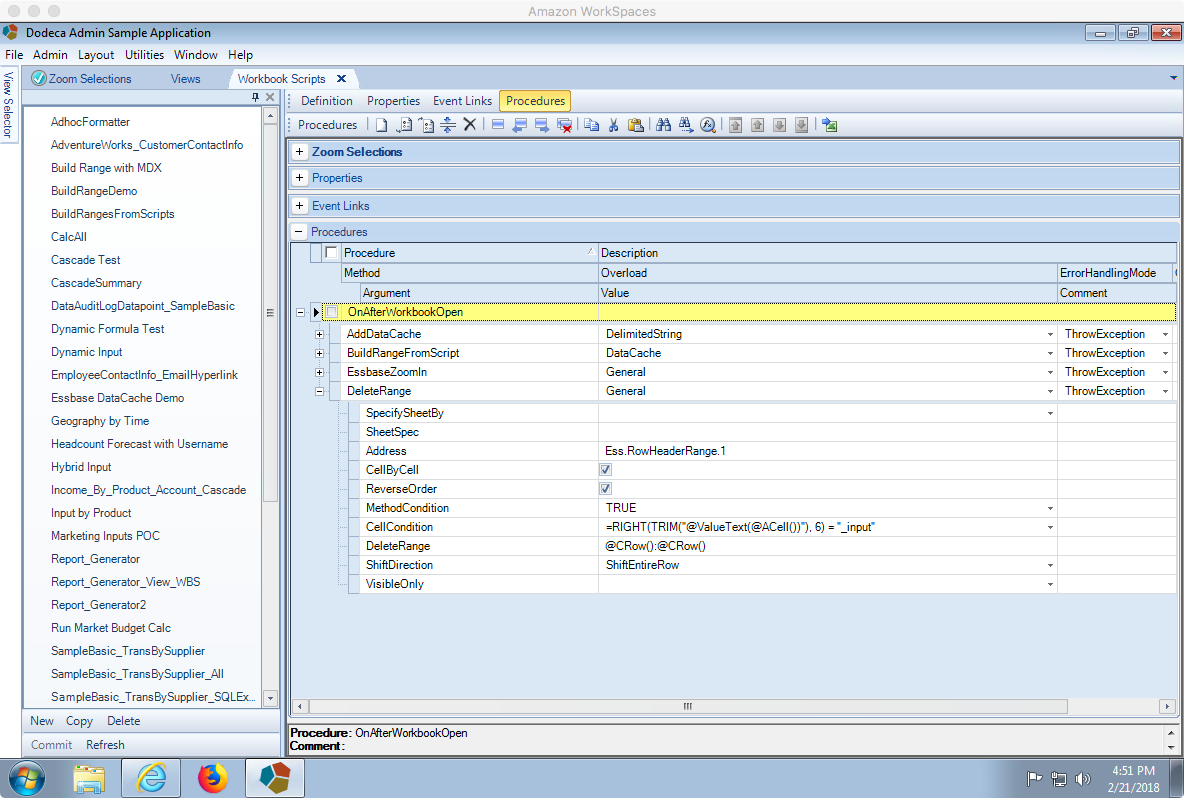
Workbook script to delete rows meeting certain criteria (acts as a filter)
There are a lot of interesting things going on here that might appear complicated but are quite logical. Let’s step through the settings on this procedure step by step to get a full sense of what’s going on:
- Address: this is a standard WBS setting that defines the specific range that the procedure will operate on. Since we want to filter rows here, we can use the range that was created for us automatically on the Essbase retrieve that outlines the range containing the rows. So to be clear, this range will contain all of the members from the Market dimension that are on the spreadsheet, including after the results of the previous zoom-in operation.
- CellByCell: when turned on, this option means that the procedure will be evaluated for each cell in the Address.
- ReverseOrder: this tells Dodeca to evaluate the contents of the range in reverse order (i.e. from the bottom up). This option is almost always used – and necessary – when deleting rows/columns from a sheet, as otherwise the delete operation wouldn’t work as expected.
- CellCondition: this is probably the most sophisticated aspect of the entire procedure. This is where we can specify a condition that must evaluate to True in order for the procedure to be executed for the current cell. In other words, for our purposes here, the procedure cell condition is evaluated for every cell in the range and when it’s true, then the actual operation (a row deletion) will occur.
The cell condition here is a combination of normal Excel formulae and workbook script functions. Here’s the full formula:
=RIGHT(TRIM("@ValueText(@ACell())"), 6) = "_input"
The Dodeca interpretation of this formula would be the following: if the rightmost 6 characters of the trimmed contents of the active cell are equivalent to the text "_input", then delete the range as specified in the DeleteRange property. So, we we have two Excel functions (RIGHT, TRIM) and we have two Dodeca WBS functions (@ValueText, @ACell). The @ACell() function evaluates to the address of the current cell being evaluated. Combined with the @ValueText() function, we get the contents of the active cell, such as East or East_input or whatever it is.
In case you’re not familiar with this sort of boolean (true/false) logic, please note that this example is exactly equivalent to the longer form that uses an actual Excel IF statement:
=IF(RIGHT(TRIM("@ValueText(@ACell())"), 6) = "_input", TRUE, FALSE)
Lastly, we don’t strictly need the TRIM function here but it doesn’t hurt. If we were looking at the left side of the cell contents rather than the right side, then we would almost definitely want to use TRIM because the cell contents might have spaces on them from the Essbase zoom-in indentation setting.
Let’s move through the rest of the settings in this DeleteRange method:
- DeleteRange: this property (which happens to share its name with the procedure itself) specifies what to actually delete when the previous CellCondition evaluates to True. As with the previous property, Dodeca functions will help out immensely here, particularly the
@CRow()function, which evaluates to the current row of the cell being processed. The syntax@CRow():@CRow()might look a little funky, but it is how we can refer to an entire row in Excel. For instance, if row 4 of the sheet is currently being evaluated, then this property evaluates to 4:4, which is a valid range that will be deleted. - ShiftDirection: currently set to ShiftEntireRow, which is more or less just like telling Excel how to shift cells around when performing the delete (as opposed to ShiftLeft, ShiftUp, or ShiftEntireColumn).
Selector List Configuration
I mentioned at the start of this post that one of the things Dodeca brings to the table in terms of the user experience is the ability to tailor the selections that a user can choose from. These selections can be populated in several ways: a pre-defined list, an Essbase report script, SQL, an MDX script, and more. A simple MDX script will fit the bill quite nicely here. The selector list configuration is pretty standard:

Setting options for the Market selector list
Most of this is pretty default – the object type is an EssbaseMdxQuery, the DefaultSelectionPolicy is LastUsedItem (meaning to pre-select the last item the user used on this view, if any), and then there is the MDX query (MdxQuery setting) itself, which can be edited directly in Dodeca’s syntax-highlighting editor:
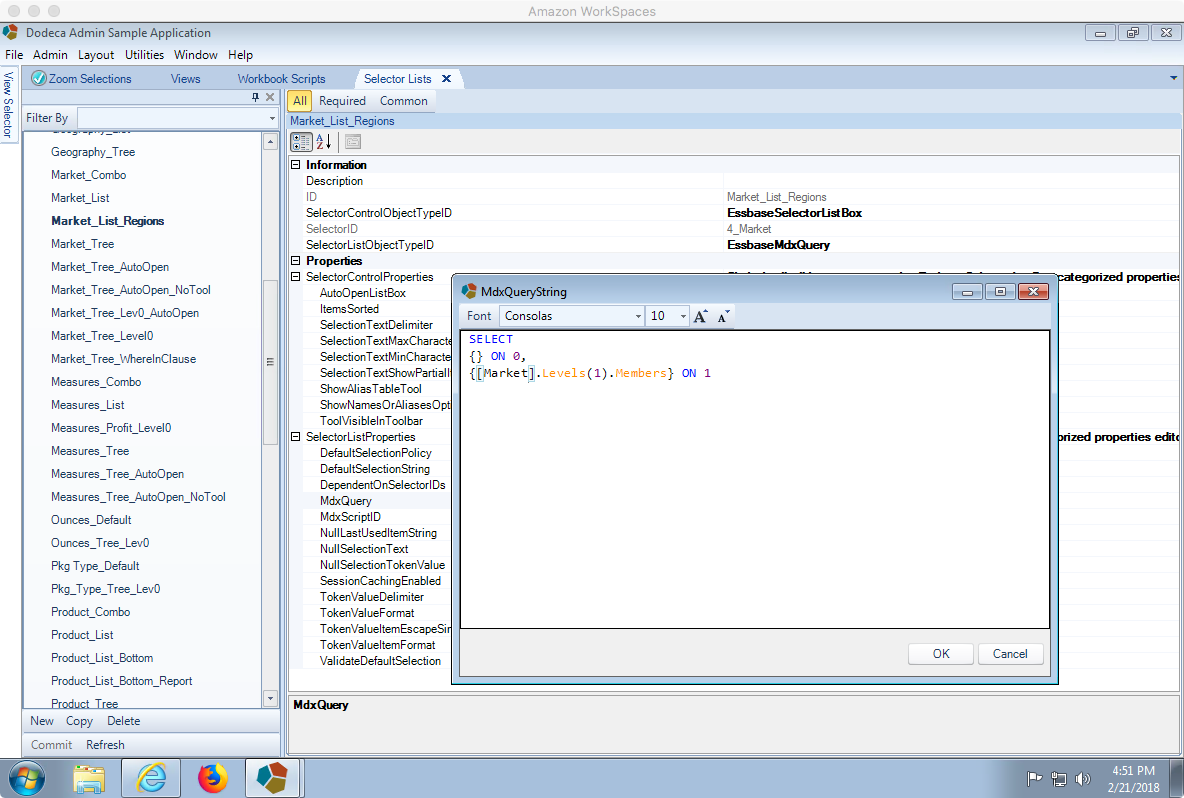
MDX script to return level 1 members from Market dimension (West, East, South, etc.)
The script to generate a list of all of the Level-1 members from the Market dimension can be written pretty simply:
SELECT
{} ON 0,
{[Market].Levels(1).Members} ON 1
As applied to the Sample/Basic outline, this generates a list containing East, West, South, and Central. If we add new level-1 members to the outline, they’ll show up automatically. There are other ways we might choose to formulate this query, by the way. For example, it might make more sense to write the query such that it just pulls the children of the Market member, rather than the members from level 1. It depends on the particular nuances of the dimension/outline, but this will work fine for now.
Building & Stepping the View
We’ve covered a lot of ground to get to this point: the template, view settings, selector configuration, MDX script, workbook scripts, and more. With everything in place it’s now time to run the view. Rather than just showing the built view and calling it a day, I want to do something a little more involved, so you can get a sense of the sequence and operation of the workbook script. In order to step the workbook script procedure by procedure, we need to make sure that debugging is turned on for the script. This is set in the main configuration of the script, via the DebugMode setting:
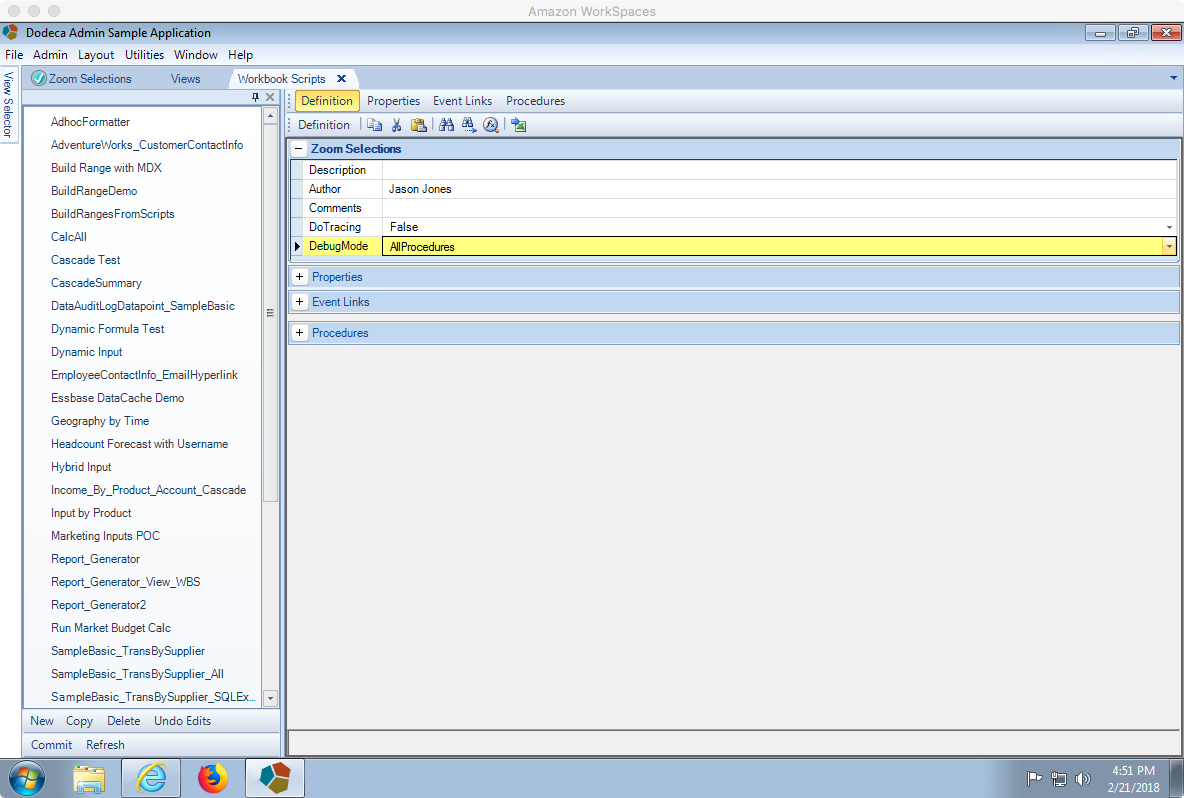
Turning DebugMode on in our Workbook Script so we can view it step by step
Now when we launch the view (as if we were a user running it), the workbook script debugger will pop up:
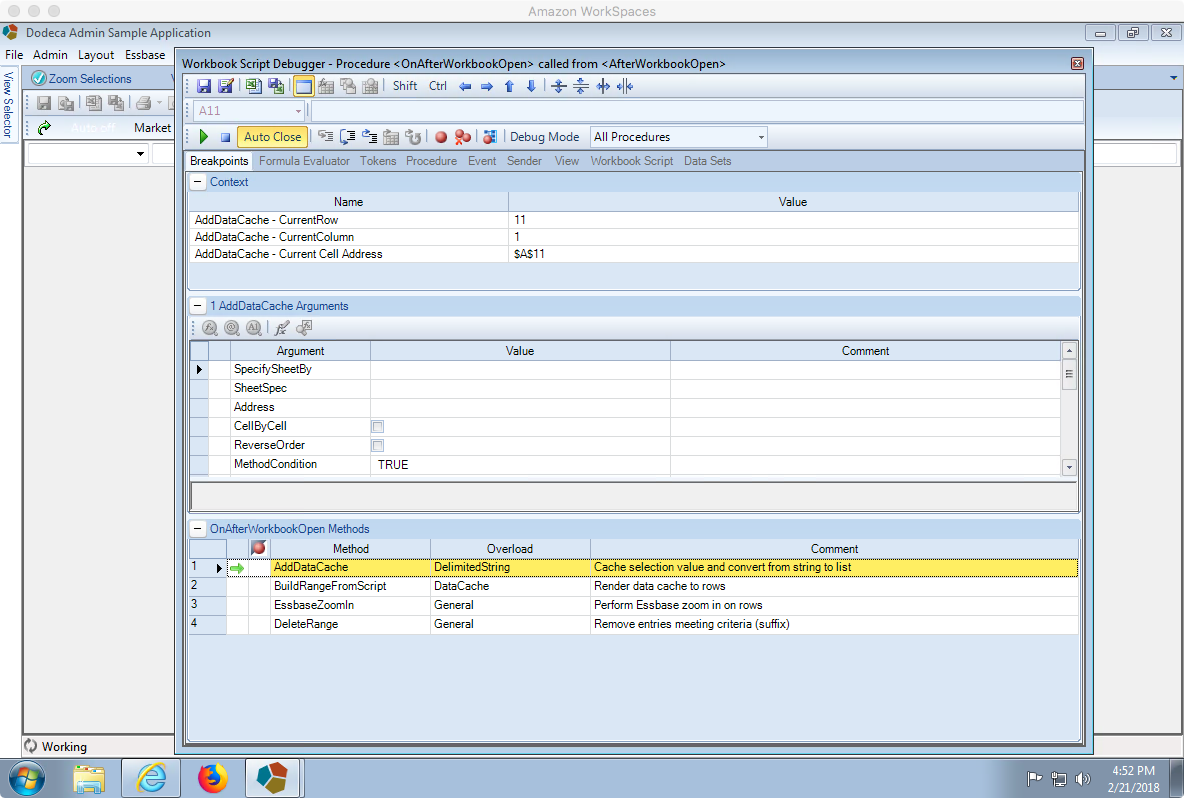
Watching WBS execute step by step: running first step and turning on displaying the view build in real-time
One thing we can do to make the step-by-step viewing process easier to interpret is to show the template in real time. We can do this by unselecting the Cover View button, which is the fifth button in the first toolbar of this debugger window. Upon uncovering the template and stepping to the next procedure, we’ll see this:
Watching the WBS execute step by step, prior to build range step
The button to move to the next step is just to the right of the “Auto Close” button. We have various programming-like debugging steps, but the only one we need here is to step to the next procedure. At this point, the AddDataCache method has already executed. As discussed above, though, it doesn’t actually have any physical effect on the template. BuildRangeFromScript is going to affect things, though:
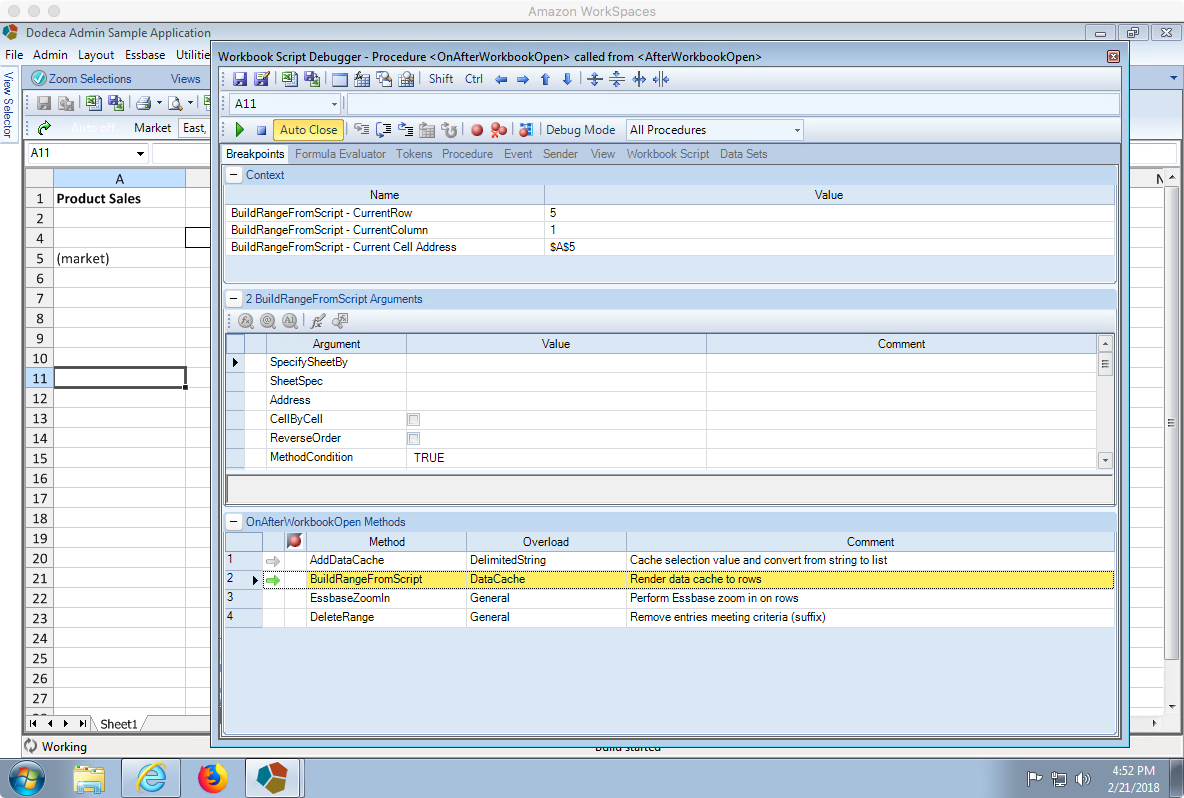
Viewing template after BuildRangeFromScript has executed
Notice that the selections from the selector (East & West) have now been placed in column A right where the StartCell was set. Now we can perform the Essbase zoom-in:
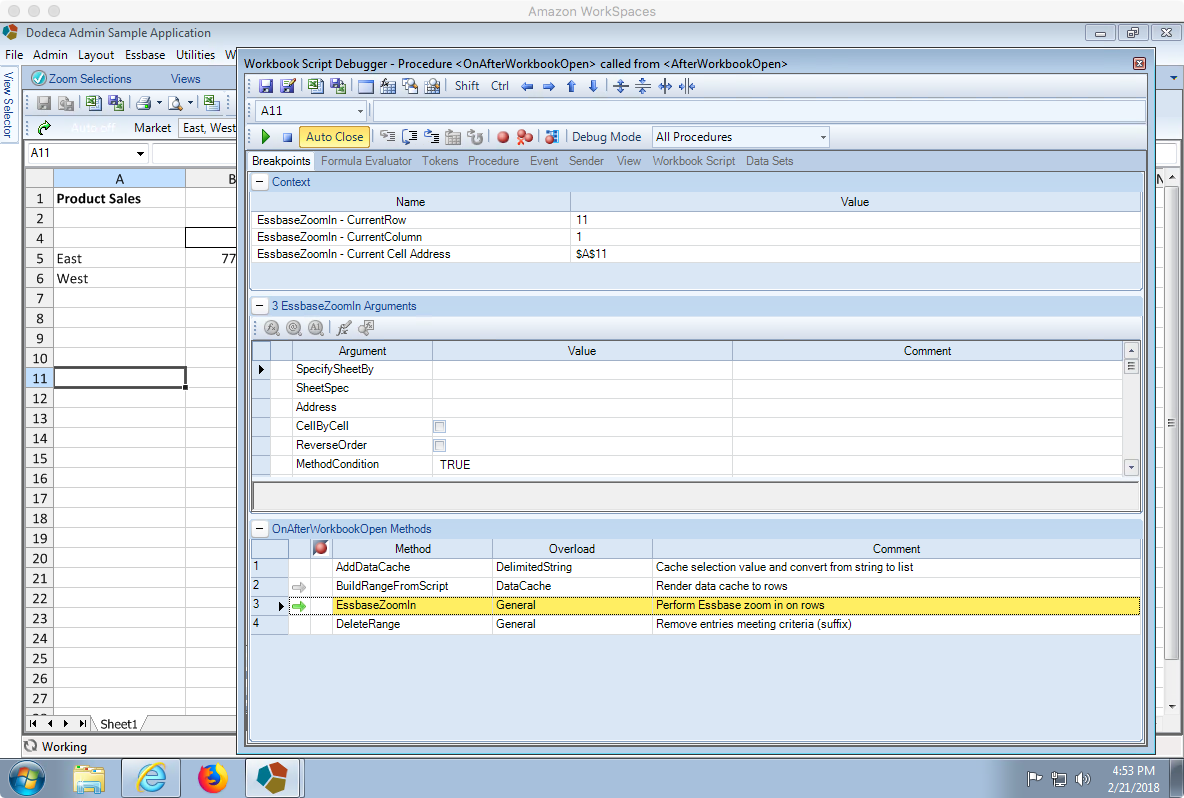
Viewing template after EssbaseZoomIn step has executed
Everything looks good so far. As expected, the extraneous “_input” members that are part of the dimension were also brought in and put on the spreadsheet. To finish things off, we’ll continue by running the delete step, which upon completion will cause the workbook script debugger window to automatically close, leaving us with just our view:
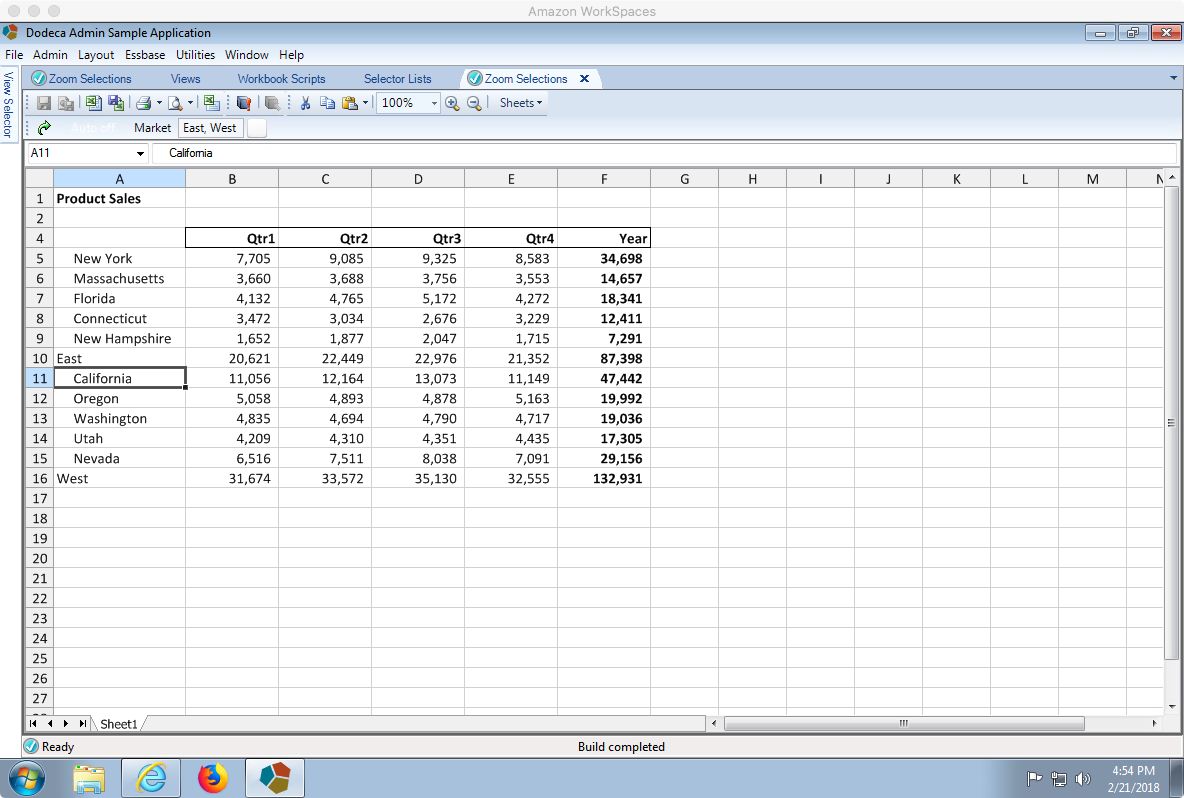
Viewing template after the DeleteRange step has executed (_input members are gone)
Just for fun, let’s take a look at the range that Dodeca automatically created for the row members of the Essbase retrieve range:
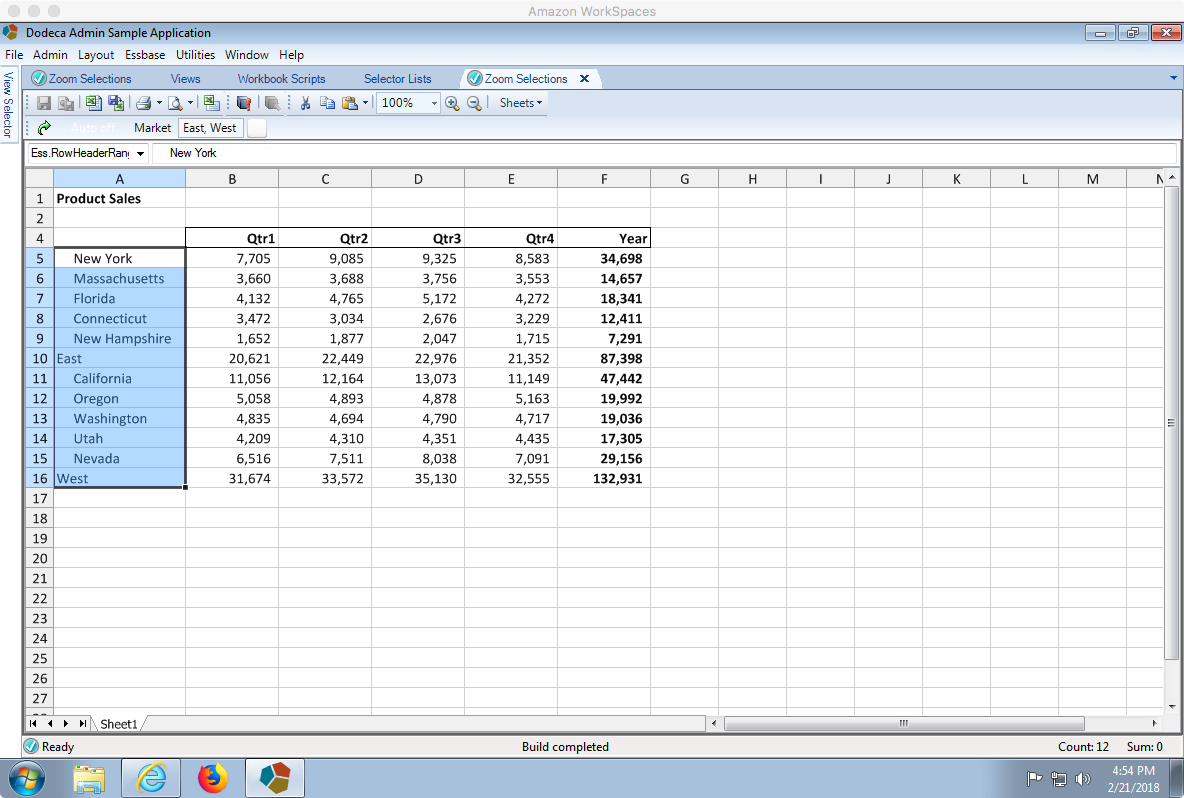
Checking out the automatic Ess.RodHeaderRange.1 named range
As with the BuildRangeFromScript expanding one of our named ranges earlier, the opposite is true when we go to delete: the range shrank, just as it would if we had deleted the row in Excel.
Summary
We covered a lot of ground here: data caches, dynamic build ranges, workbook script, MDX selector lists, debugging, and more. I hope you found this walkthrough insightful and how Dodeca can be used to complement Essbase and operationalize your data in the exact way that your users want to see and interact with it.
Hi Jason,
Do you know how to save a checked option in a checkbox in the set control method? Please guide me if you know