Today I want to look at a practical example in Dodeca that came up while I was at a Dodeca training workshop for a client the other week. We know that Dodeca can update data in a relational database using its robust SQL Passthrough DataSet functionality. And we know that it can automatically use values from the selectors to update columns as needed (for example, if the user has selected a Scenario of Actual, we could use a token such as [T.Scenario] in the SQL query).
Now let’s say that we have a table with data, such as headcount forecast data, and for whatever reason (auditing), we want to record the username of the user that is inputting the data. To achieve this, we can use a single Workbook Script method and a function to dynamically insert the Windows username of the current user into the view, and then use that token just as we would use any other token. In this case, we’ll use that token in the INSERT/UPDATE statements on the SQL Passthrough DataSet. Note that none of this configuration has anything to do with security, per se, it’s purely to have a column in the table to make it easy to see who updated/inserted a given piece of data.
In the following steps, I am going to create the SQL Passthrough DataSet (for defining how Dodeca should select, insert, and update data in a simple relational table), lay out the SQL Excel View template (with a named range to be filled with data), set a few options, create a simple workbook script, and then test things out. Here goes:
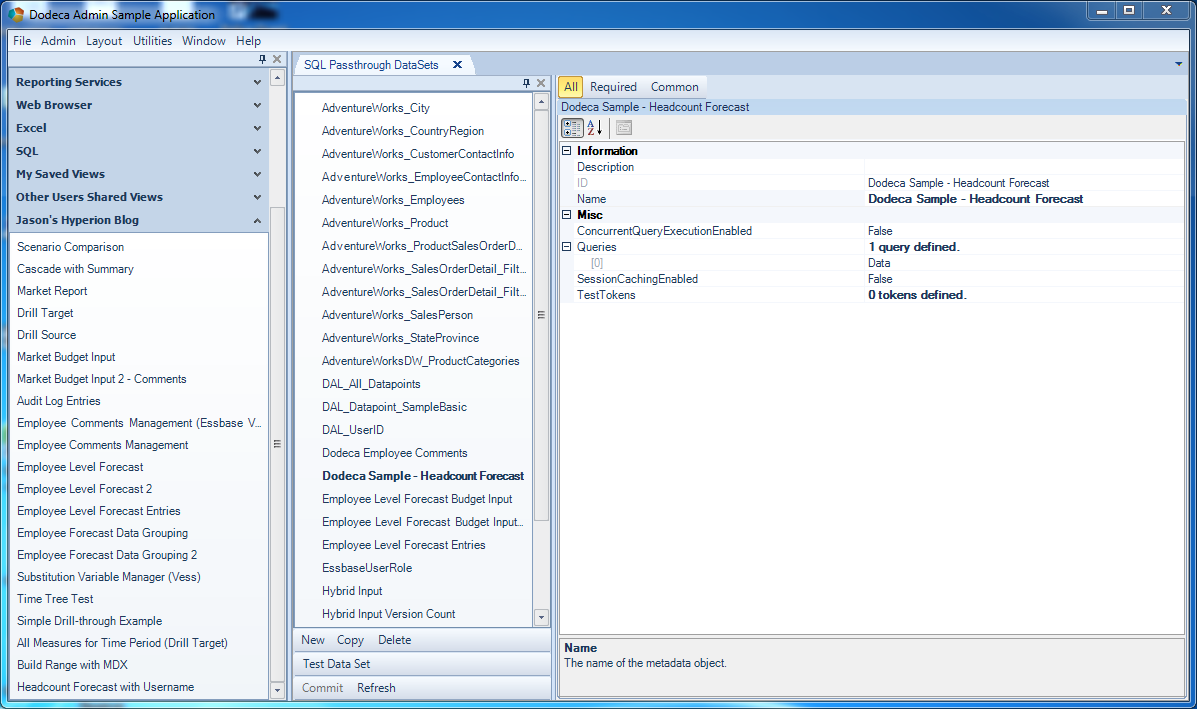
First things first, we need to make the SQL Passthrough DataSet. The following screenshot shows the overview for this object, mostly shown just for completeness (as the main configuration happens inside of the Query definition). But here you can see that this SQLPTDS has one query defined:
SQL Passthrough DataSet properties
Now for the query definition:
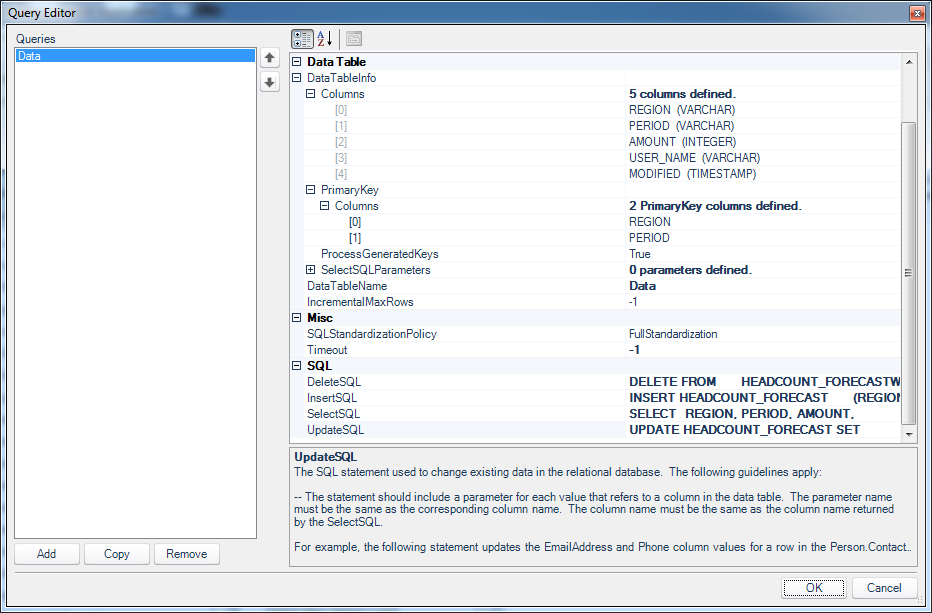
Editing the query for updating, adding, selecting, and deleting “headcount forecast” entries
You can see that I’ve laid out the columns for this simple table (this isn’t always strictly necessary but it doesn’t hurt), the compound primary key (REGION + PERIOD), a name to link it to the view (DataTableName = Data), and the four SQL templates for deleting, inserting, selecting, and updating.
Here is the code for selecting records from the table:
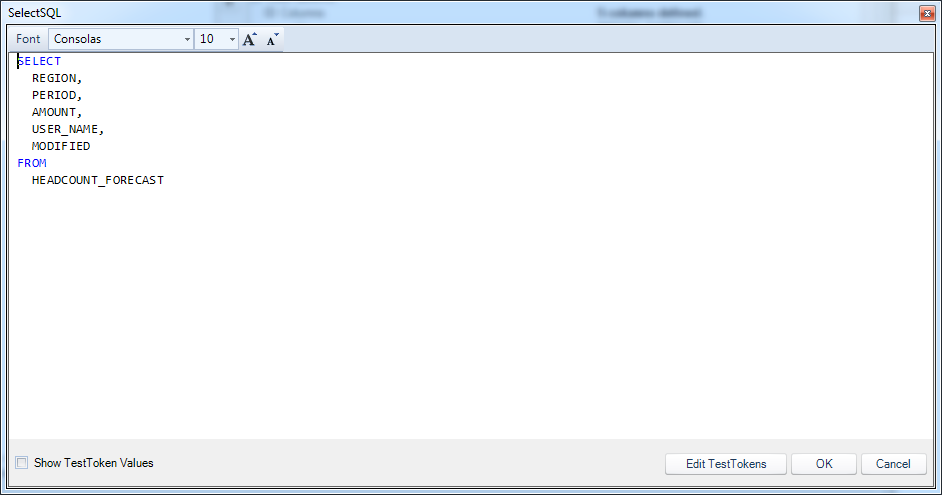
The SELECT query for the headcount forecast data
And for inserting new ones:
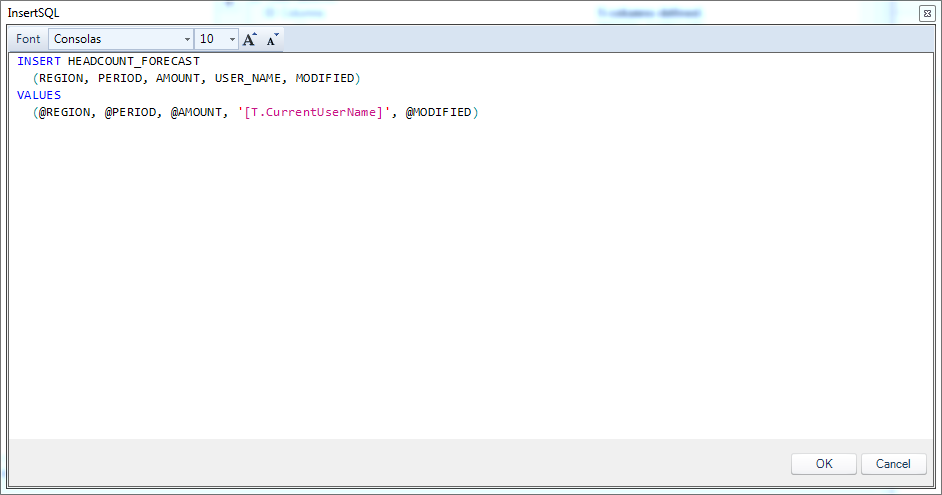
The query for inserting a new headcount forecast entry
For deleting ones:
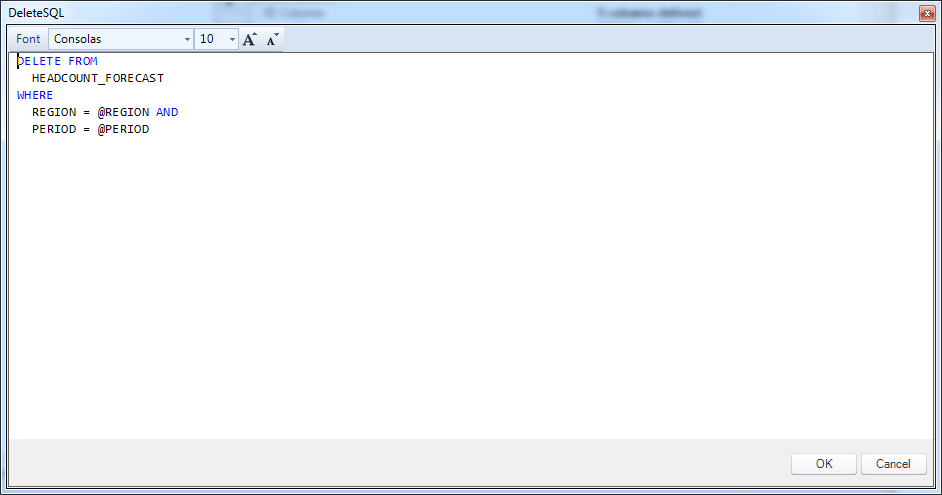
Deleting a headcount forecast entry
And for updating them:
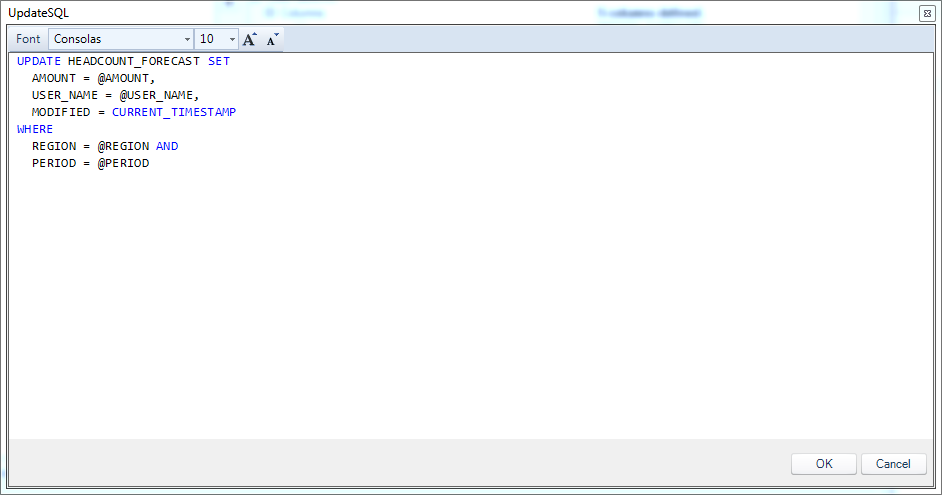
The code for updating a headcount forecast entry
Of these statements, the INSERT is the most interesting. You can see that we are using the [T.CurrentUserName] token. I’ve shown various examples before that insert with tokens, but the difference this time is that this token isn’t one that comes from a selector on the view (indeed, this view doesn’t have any selectors). This token will be created when the view is opening using some custom Workbook Script that we’ll setup in just a moment. As another nicety in terms of populating this audit type data into the table, we use the CURRENT_TIMESTAMP function to fill the MODIFIED column. Note that the CURRENT_TIMESTAMP function is native to MySQL databases. For Oracle and Microsoft SQL Server, you’d use a different function.
With the SQL Passthrough DataSet configured, we can now go create the view template:
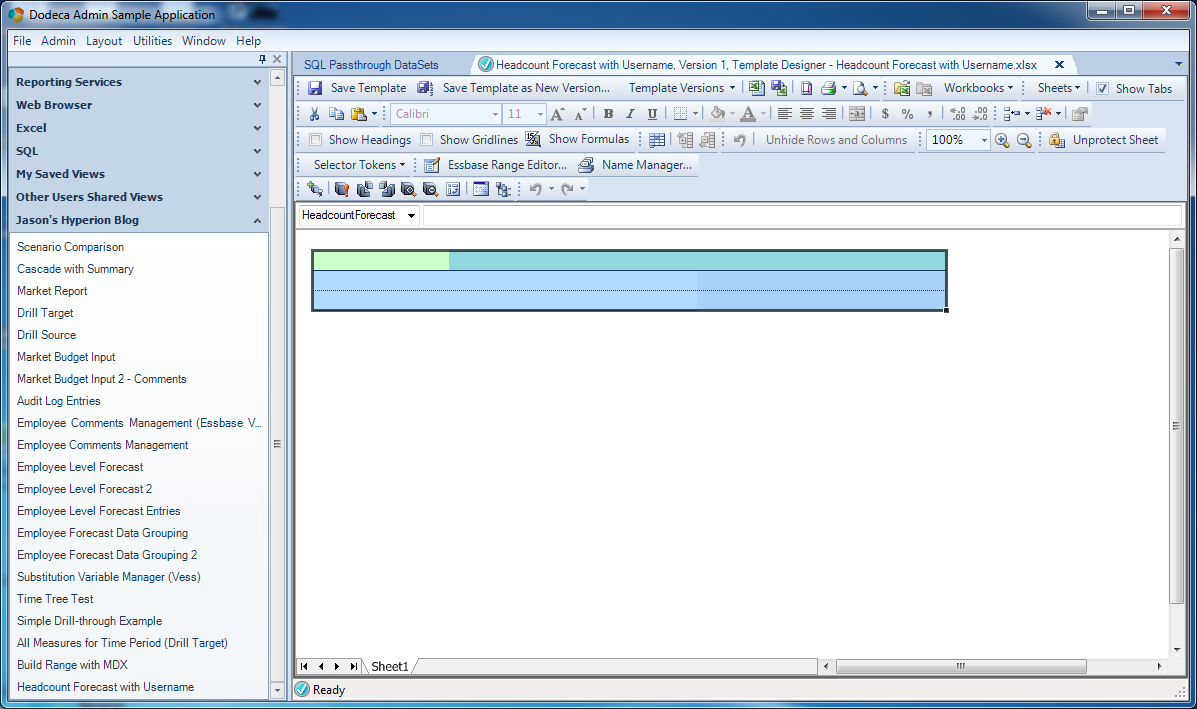
Excel template configuration for the headcount forecast editing area
The main thing here is the named range that will be populated with data from the SQL table. In this case, it’s three rows tall. This is the size you make a named range when you are going to retrieve the SQL data along with the headers (column labels). If you don’t bring back the headers, then you’d want to make this just two rows tall. You can see that I have named the range (HeadcountForecast). As additional superficial formatting, I have turned off row and column headers on the spreadsheet and turned off gridlines. It may be hard to tell but if you look closely you can see that I made the last two columns of the range light grey. These columns correspond to the user name and the modified time of the row. I don’t allow the user to edit these so I have changed their color.
Again, you can’t really see it but one other thing I did was turn off cell protection for the first three rows of the named range (this is configured using a checkbox on the properties for a cell/range), and I turned on “Protect Sheet”. The effect of this is that the user will only be able to edit cells I designate. This is one of the “quieter” but amazing features in Dodeca: we can retrieve SQL and Essbase data into a sheet however we want, and lock any cells we want. In addition to the cell background color being grey and offering a visual cue that data is not editable there, we can just lock the cells entirely to prevent changes, and prevent the user from thinking that they should be able to or want to change the data.
With the template all setup, we can now turn our attention to the view configuration. The view configuration is pretty standard, so I’ll jump right into the DataSet Range editor (part of the SQLPassthrough DataSet configuration on the view):
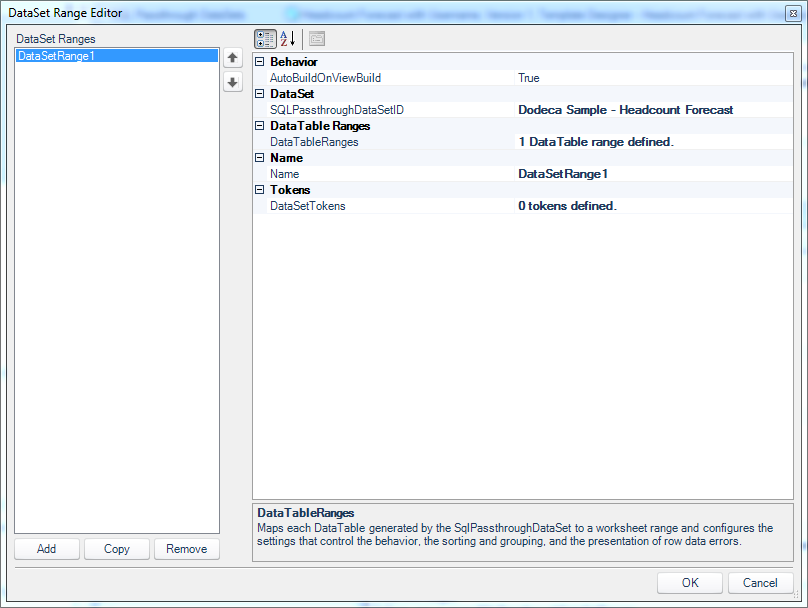
The DataSet Range editor
Here you see that I just have the one DataTable defined for the DataSet. Also notice that I have chosen the proper SQLPassthroughDataSetID from earlier. Now inside the DataTable Range Editor:
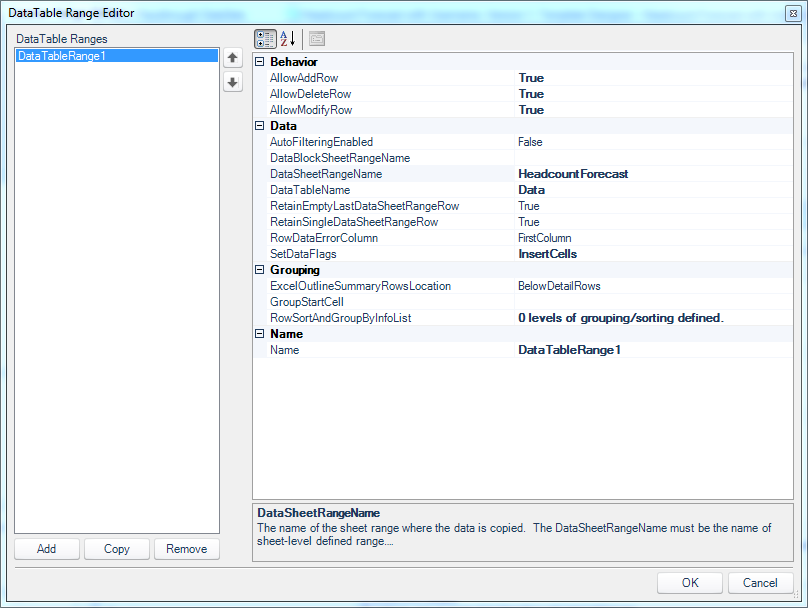
The DataTableRange Editor within the DataSet Range editor.
As with examples I’ve shown before, I have turned on the ability to add, delete, and modify rows, specified the corresponding named range on the Excel template, set the proper DataTableName from earlier, and configured SetDataFlags to InsertCells (so that when the view is built, the data from the SQL table will effectively be “inserted” into the view, thus extending our formatting and preserving cell references across the sheet).
Let’s take a quick look at the view properties for this view:
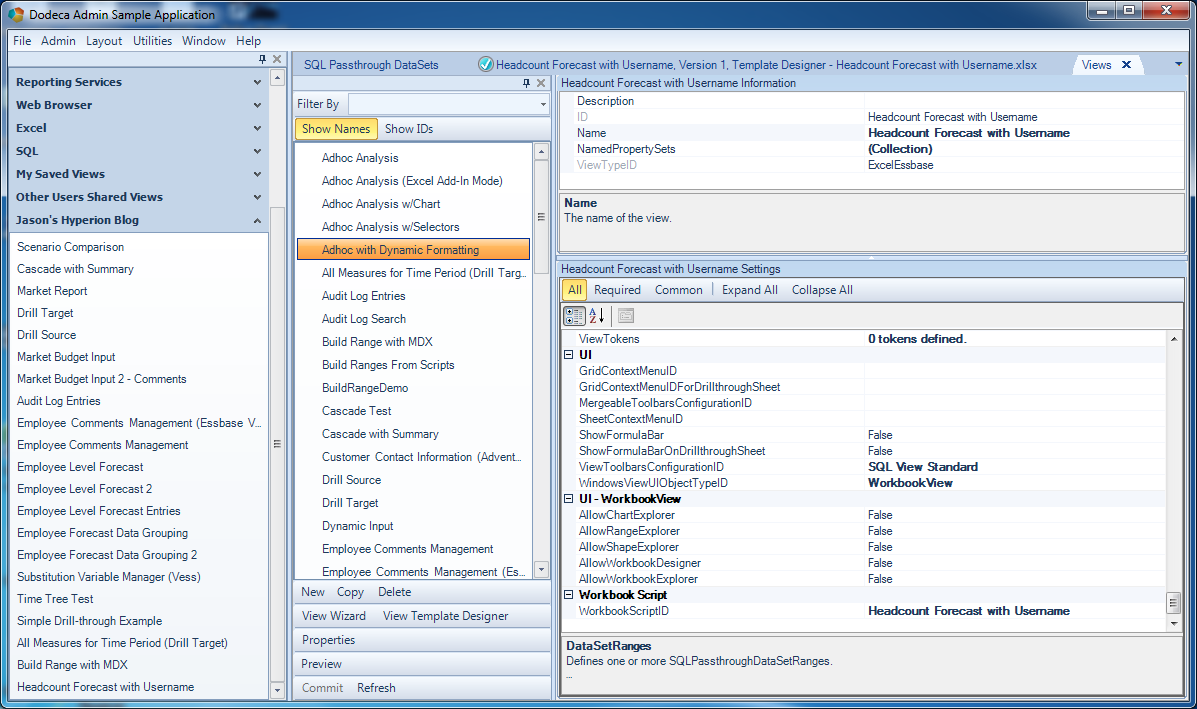
Some of the view properties on the headcount forecast view
The main thing I want to make sure to show is that there’s a new Workbook Script for this view (as seen in the last row of the view properties). I’m going to jump over to editing this WBS and to do this I can just right click where it says WorkbookScriptID and jump directly to the editor:
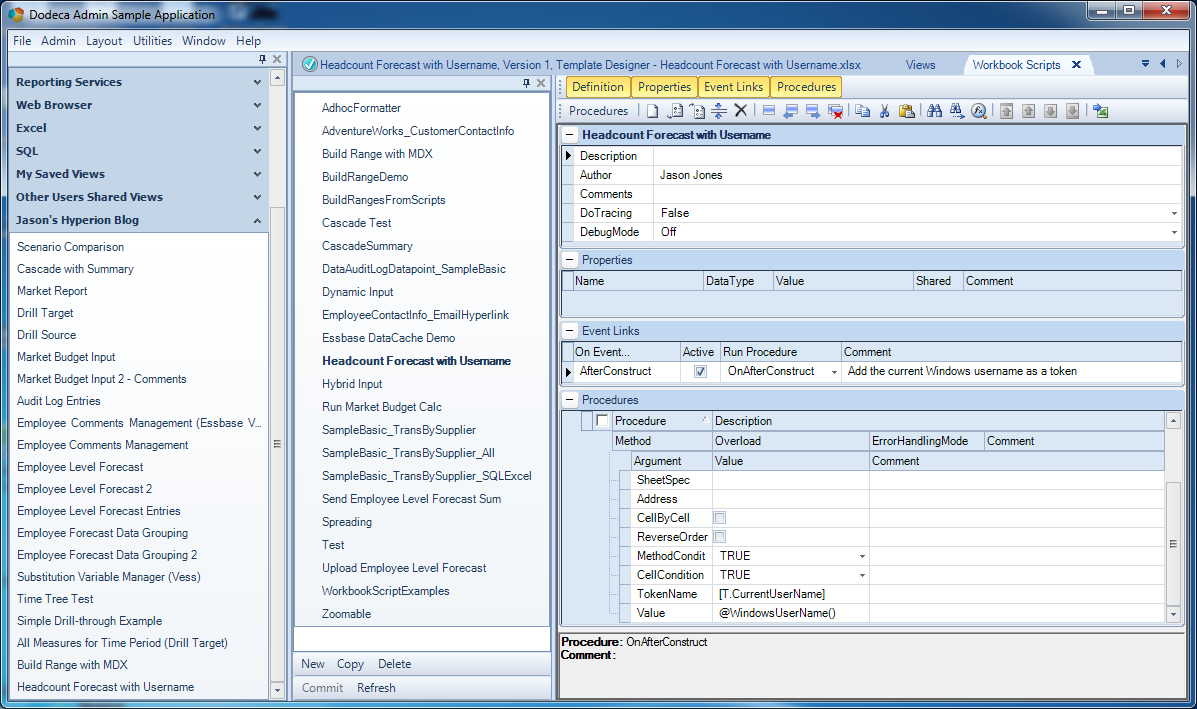
Workbook Script for adding a token to the view dynamically
In the above screenshot, there’s a lot going on, but this shot shows us everything we need to know about the workbook script that I created ahead of time. Remember, the goal of the script is is to be run when the view is built so that we can dynamically create a token to use in the SQL. In the right side of the screenshot, towards the middle, you can see that when the even AfterConstruct is fired, we want to run this procedure.
As for the procedure itself, it’s very simple. I’m using the AddToken WBS method and a specific overload (think version) called View. This method is specifically designed for the use case we have here: to add a token to the view (which we can then use in the SQL Passthrough DataSet or whatever). In the last two rows of the method configuration, I have set the TokenName to [T.CurrentUserName]. Lastly, the value for this token will be set using the @WindowsUserName function. This WBS function (denoted by the @ symbol) is one of the many functions available to us in the WBS language. This particular function evaluates to the current Windows username. There are actually a couple of related functions related to the current user name (such as the current authenticated user, the current logged in Essbase user, etc.), but for this example, this one will work just fine.
Now when the view is opened, this WBS will run and add the token to the view that we can then reference in the SQL Passthrough DataSet. To now show this all in action, here’s the built view:

The built view
Now let’s type in data for a new row:
Testing the view by typing in a new region, period, and amount
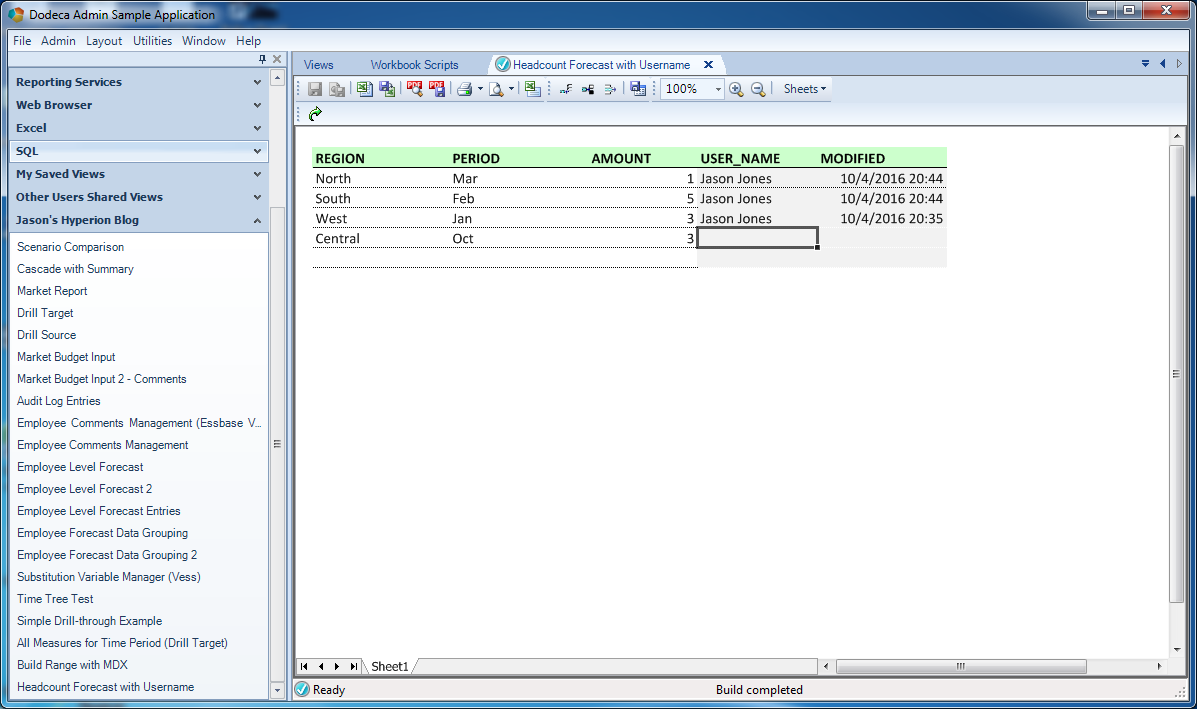
Note that I didn’t (can’t) enter data for the USER_NAME or MODIFIED columns. And now when I hit the save data button:
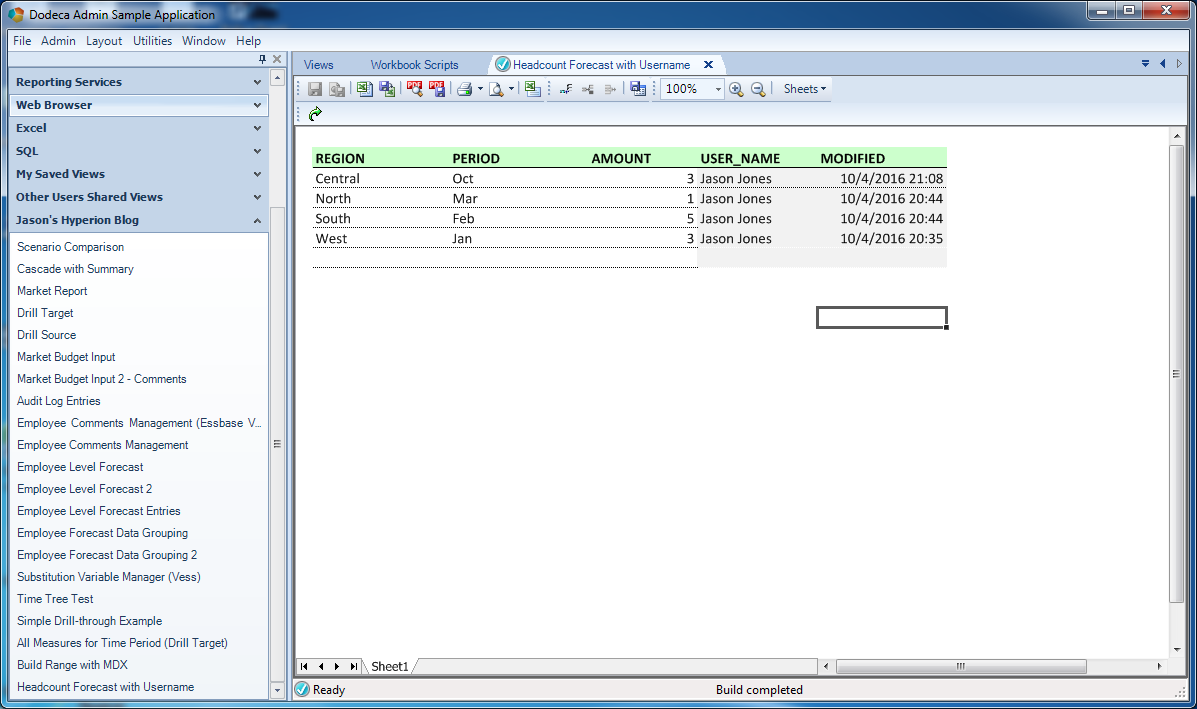
The view after saving the data, with the additional columns populated
Tada! In my case my Windows user name is “Jason Jones”. The current timestamp was also inserted into the table, as per my SQL definition.
Conclusion
I hope you enjoyed this cross-functional example. It’s a very practical and commonly used technique in the world of Dodeca. To the extent that the layout of a spreadsheet is Dodeca’s declarative side, WBS is the procedural side, and often times it’s the glue (magic glue!) that ties everything together and gives us the power to address the multitude of one-offs that so often need to be accommodated in the enterprise world.