Last week I wrote about how you can configure user selectable Essbase connections on a Dodeca view. One of the comments on the blog article was from a Dodeca customer that said, “Hey, that’s great and all, but what about a Dodeca view with multiple Essbase connections?” In other words: Can we setup a Dodeca view that pulls data from multiple user-selectable connections and have data from different connections on the same sheet? The answer is yes – although the configuration is just a tiny bit different than what I thought it would be (it was actually simpler). This blog post will walk through how to set this up.
Specifying Retrieval Connections
The first thing I want to review briefly is how specific connections are defined for retrieval areas. We tend to think of a Dodeca view as having a specific Essbase connection set at design time. But when we need a little more control, up to and including a different connection for every single retrieve range, we can do that too. This is used to great effect at numerous organizations that use Dodeca to pull together data from disparate cubes and even relational databases (all on the same spreadsheet). Whereas we typically define Essbase retrieval ranges such as “Ess.Retrieve.Range.1“, all we need to do to define a specific connection to use is to define another name “Ess.Retrieve.Connection.1” (making sure that the IDs at the end match each other – in this case, the number 1).
Dynamic Retrieval Connections
Normally the connection IDs are static (defined at design time), but that doesn’t have to be the case. In fact, the Dodeca template designer even makes defining these specific retrieval connections even easier by giving us a bespoke GUI for defining them:
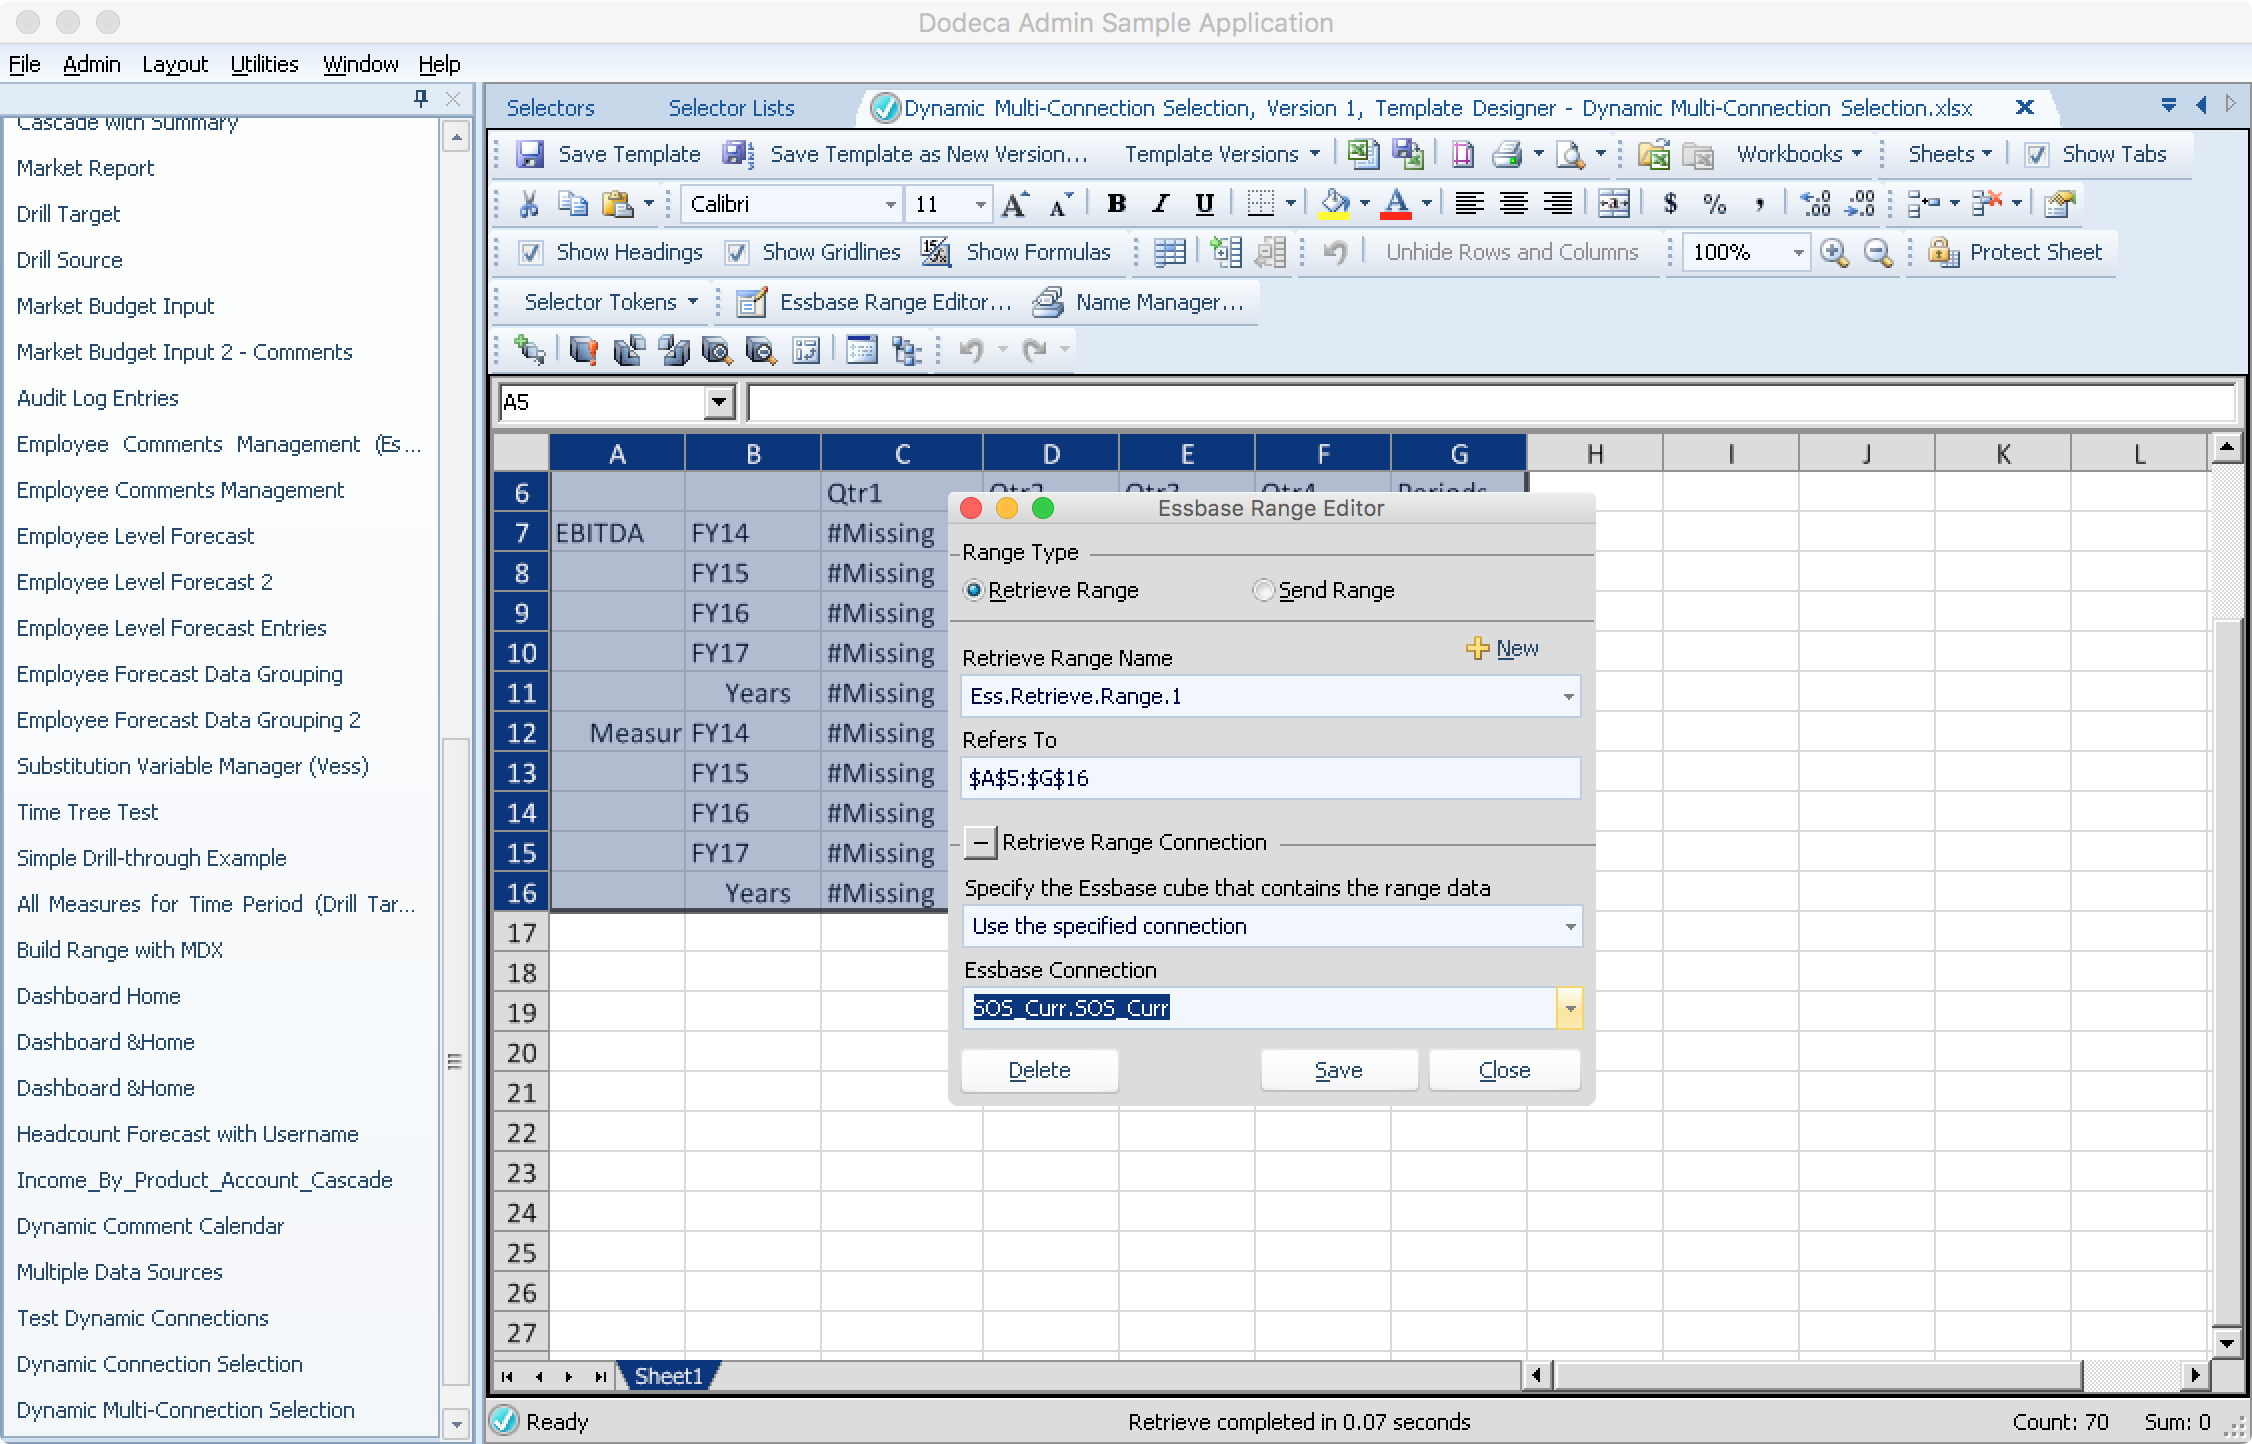
Defining a Dodeca Essbase retrieve range that will use a specific connection
In the preceding example you can see that I have the retrieve range, and then I chose “Use the specified connection”, which then allowed me to choose one of the Essbase Connection objects that has been defined.
Now, in order to allow my user to choose a connection, I’m going to need to create the appropriate selectors and selector lists. Let’s go ahead and create two new selectors, named SOS_Conn1 and SOS_Conn2:
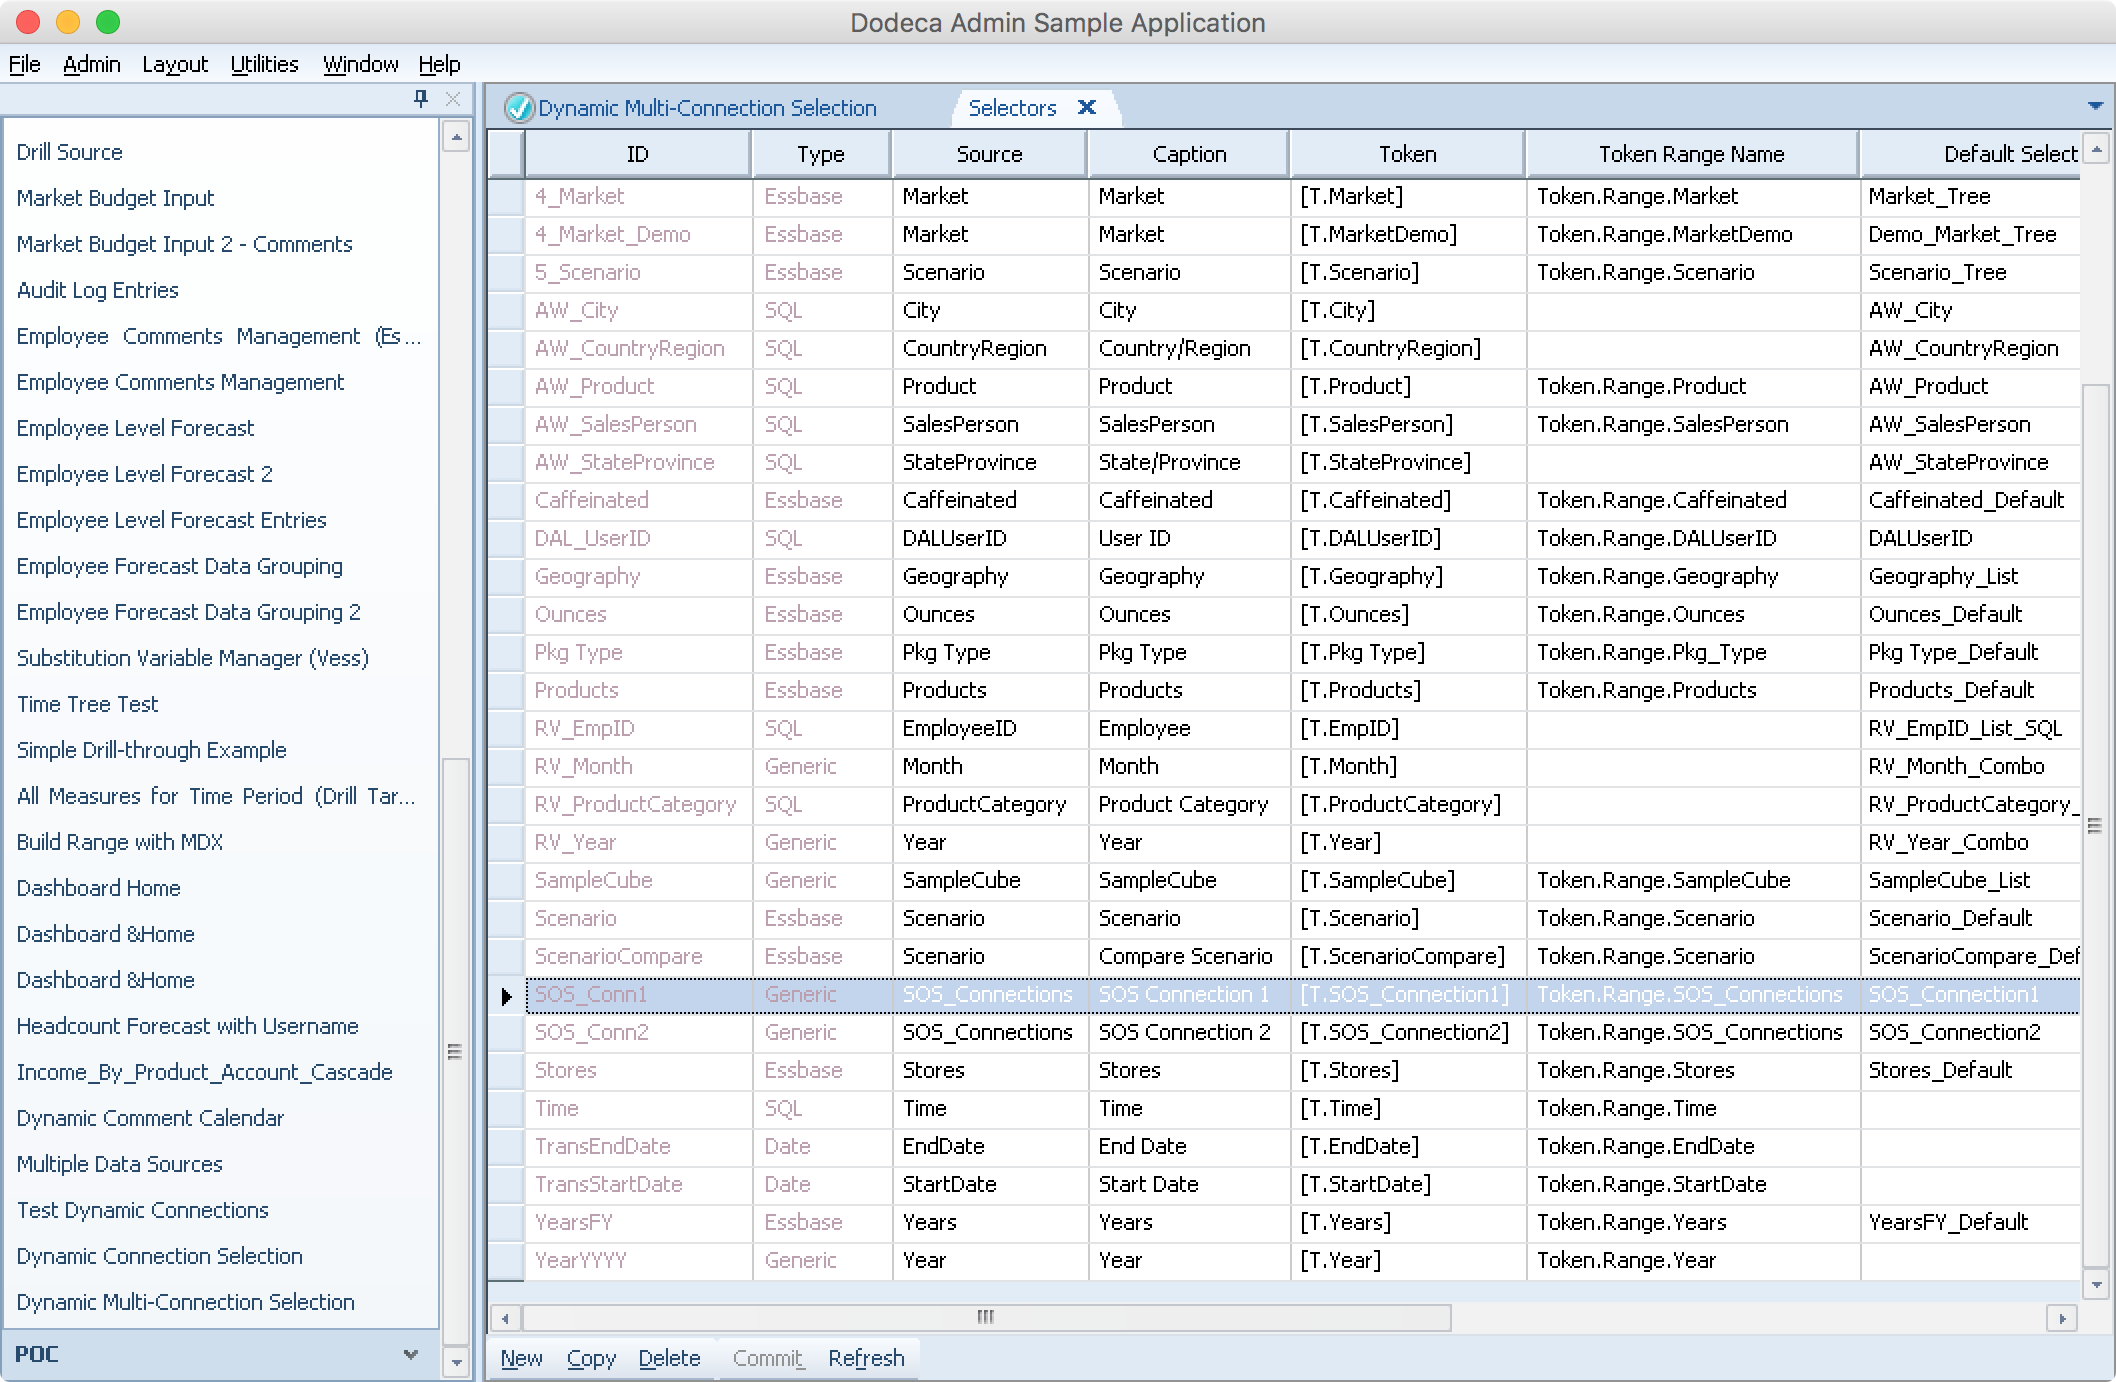
Creating selectors for the different connections we will choose dynamically
Also notice that each selector has it’s own token: [T.SOS_Connection1] and [T.SOS_Connection2], respectively. Now to define the selector lists for these. I’ll just show one since they are the same:
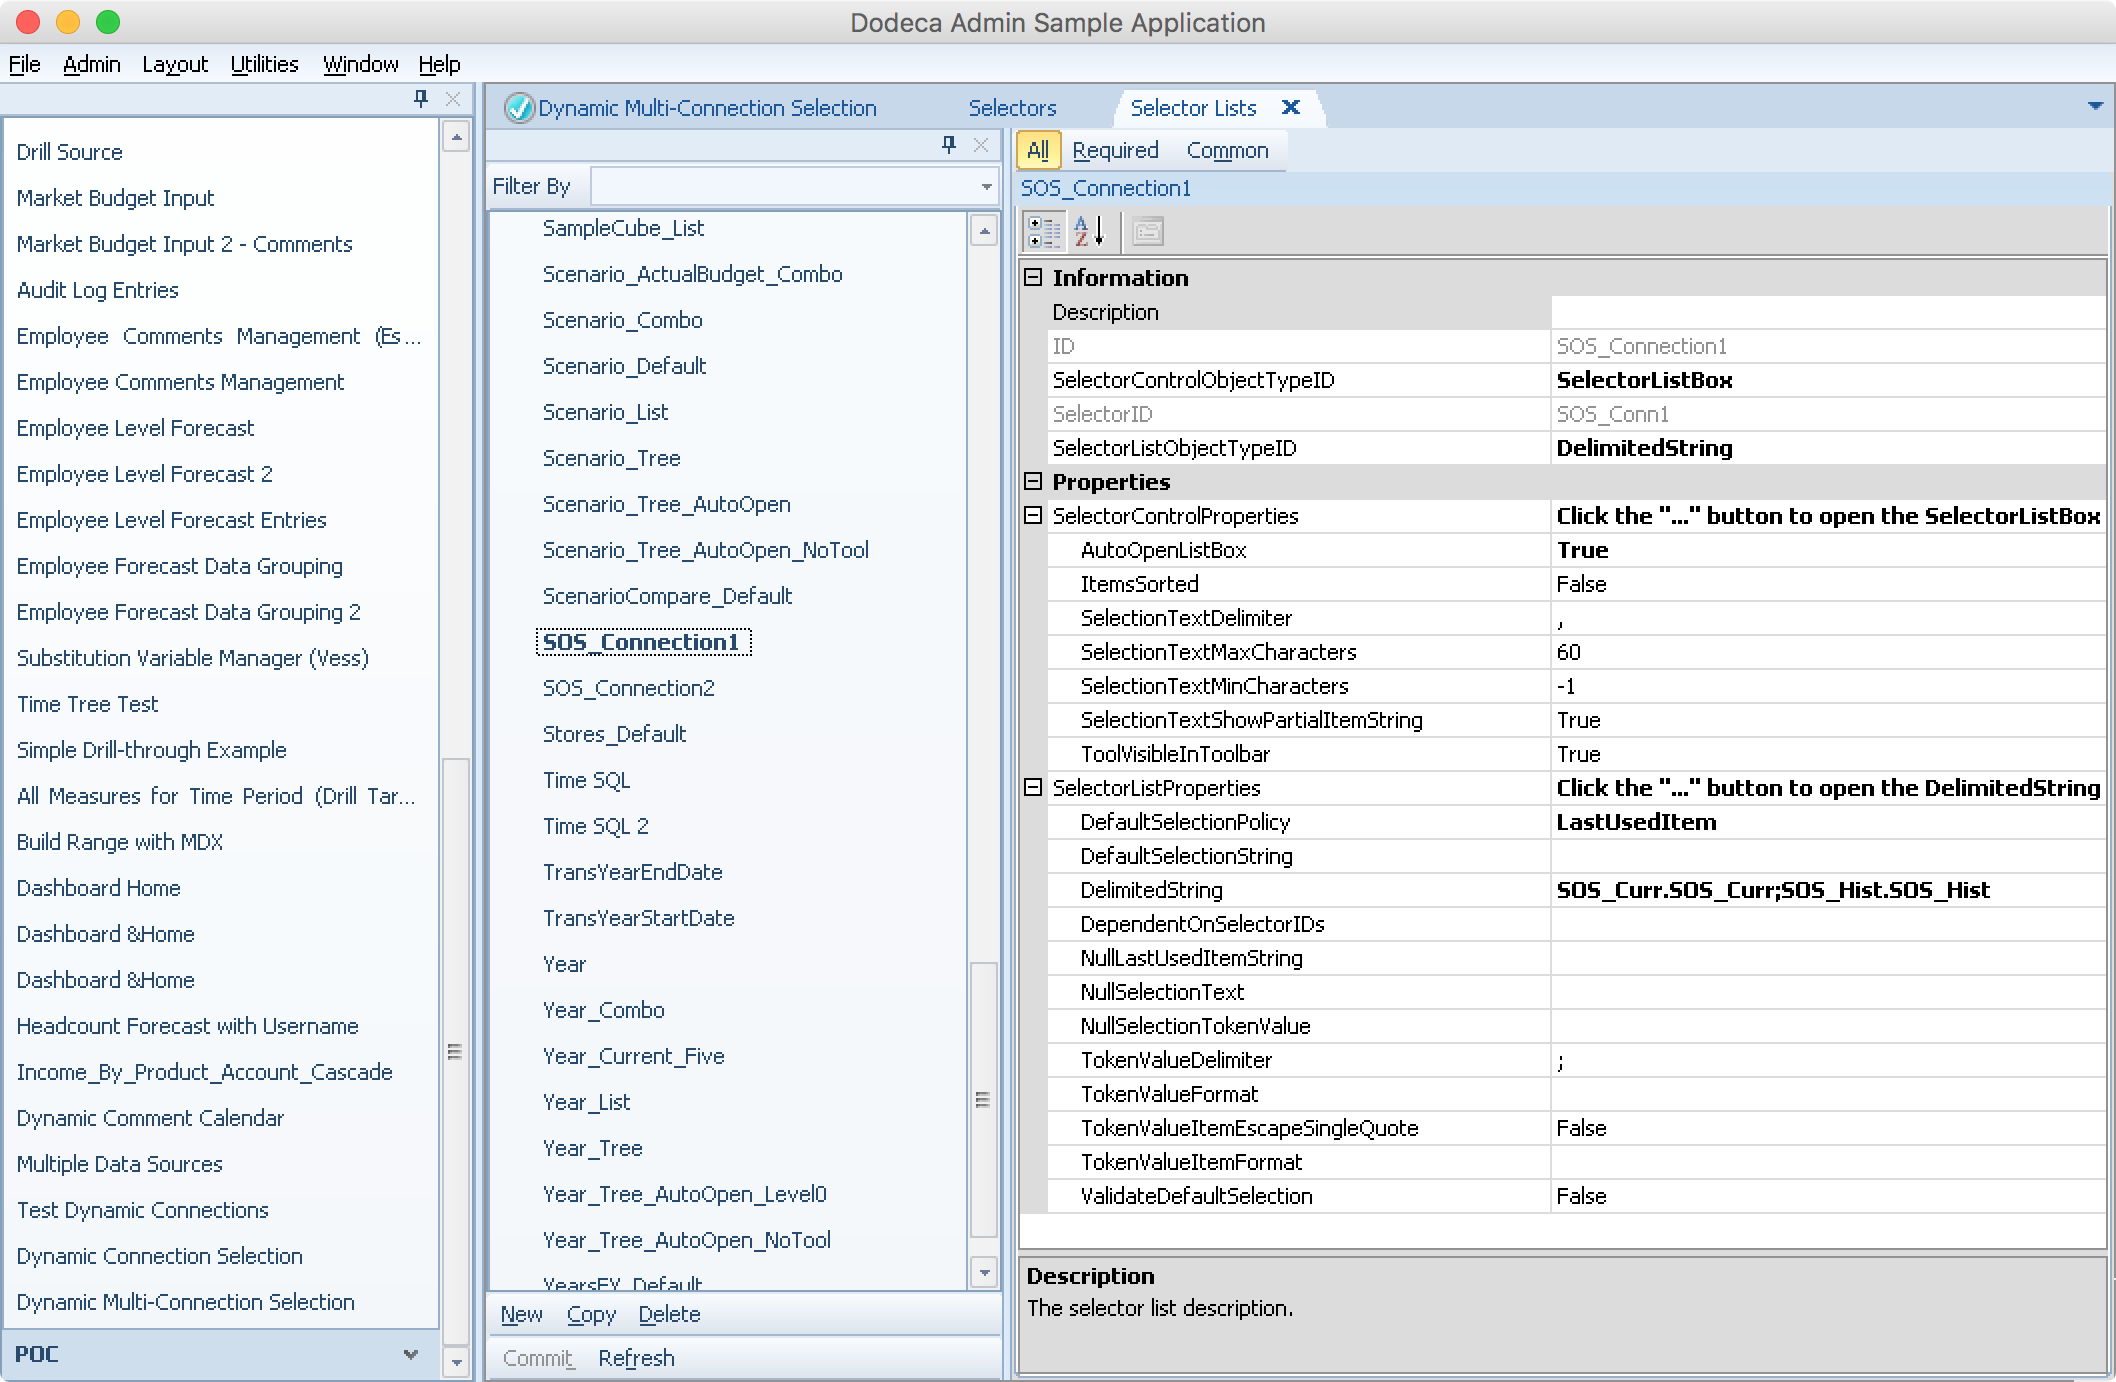
Creating/editing a Dodeca selector based on a delimited string
Notice that I used the DelimitedString list type again for this example. I can of course source the data from an Essbase dimension, SQL query, or whatever, but for demo purposes, the delimited string type is very easy to get running with. I’ll get more into the details later, but while we’re on this screen I also want to point out that I set the AutoOpenListBox setting to True, and the DefaultSelectionPolicy is set to LastUsedItem. These are choices that affect the user interface/experience. In this case I’m telling Dodeca that I want the list box for the selector to pop open automatically when the view opens, and I also want the selector to remember the last value that the user selected. This adds a bit of polish to the user experience that I really like, so the user can just pop open the view, and if they have a previous selection, it’ll automatically restore those so they don’t have to set everything all at once every time they open the view.
Template Configuration
Now that I have the Selectors and Selector Lists basically configured, let’s go to the template. For this example I am going to have two retrieval ranges: one for each connection that the user is allowed to dynamically select. In the following screenshot you can see my first retrieval range, and just above it I have a cell with the text “Using [T.SOS_Connection1]“. The token will be replaced by the contents of the selector when the user makes a choice. I don’t strictly have to do this for any functional reason; I just wanted to show it so that I can easily see what connection was used in this example.
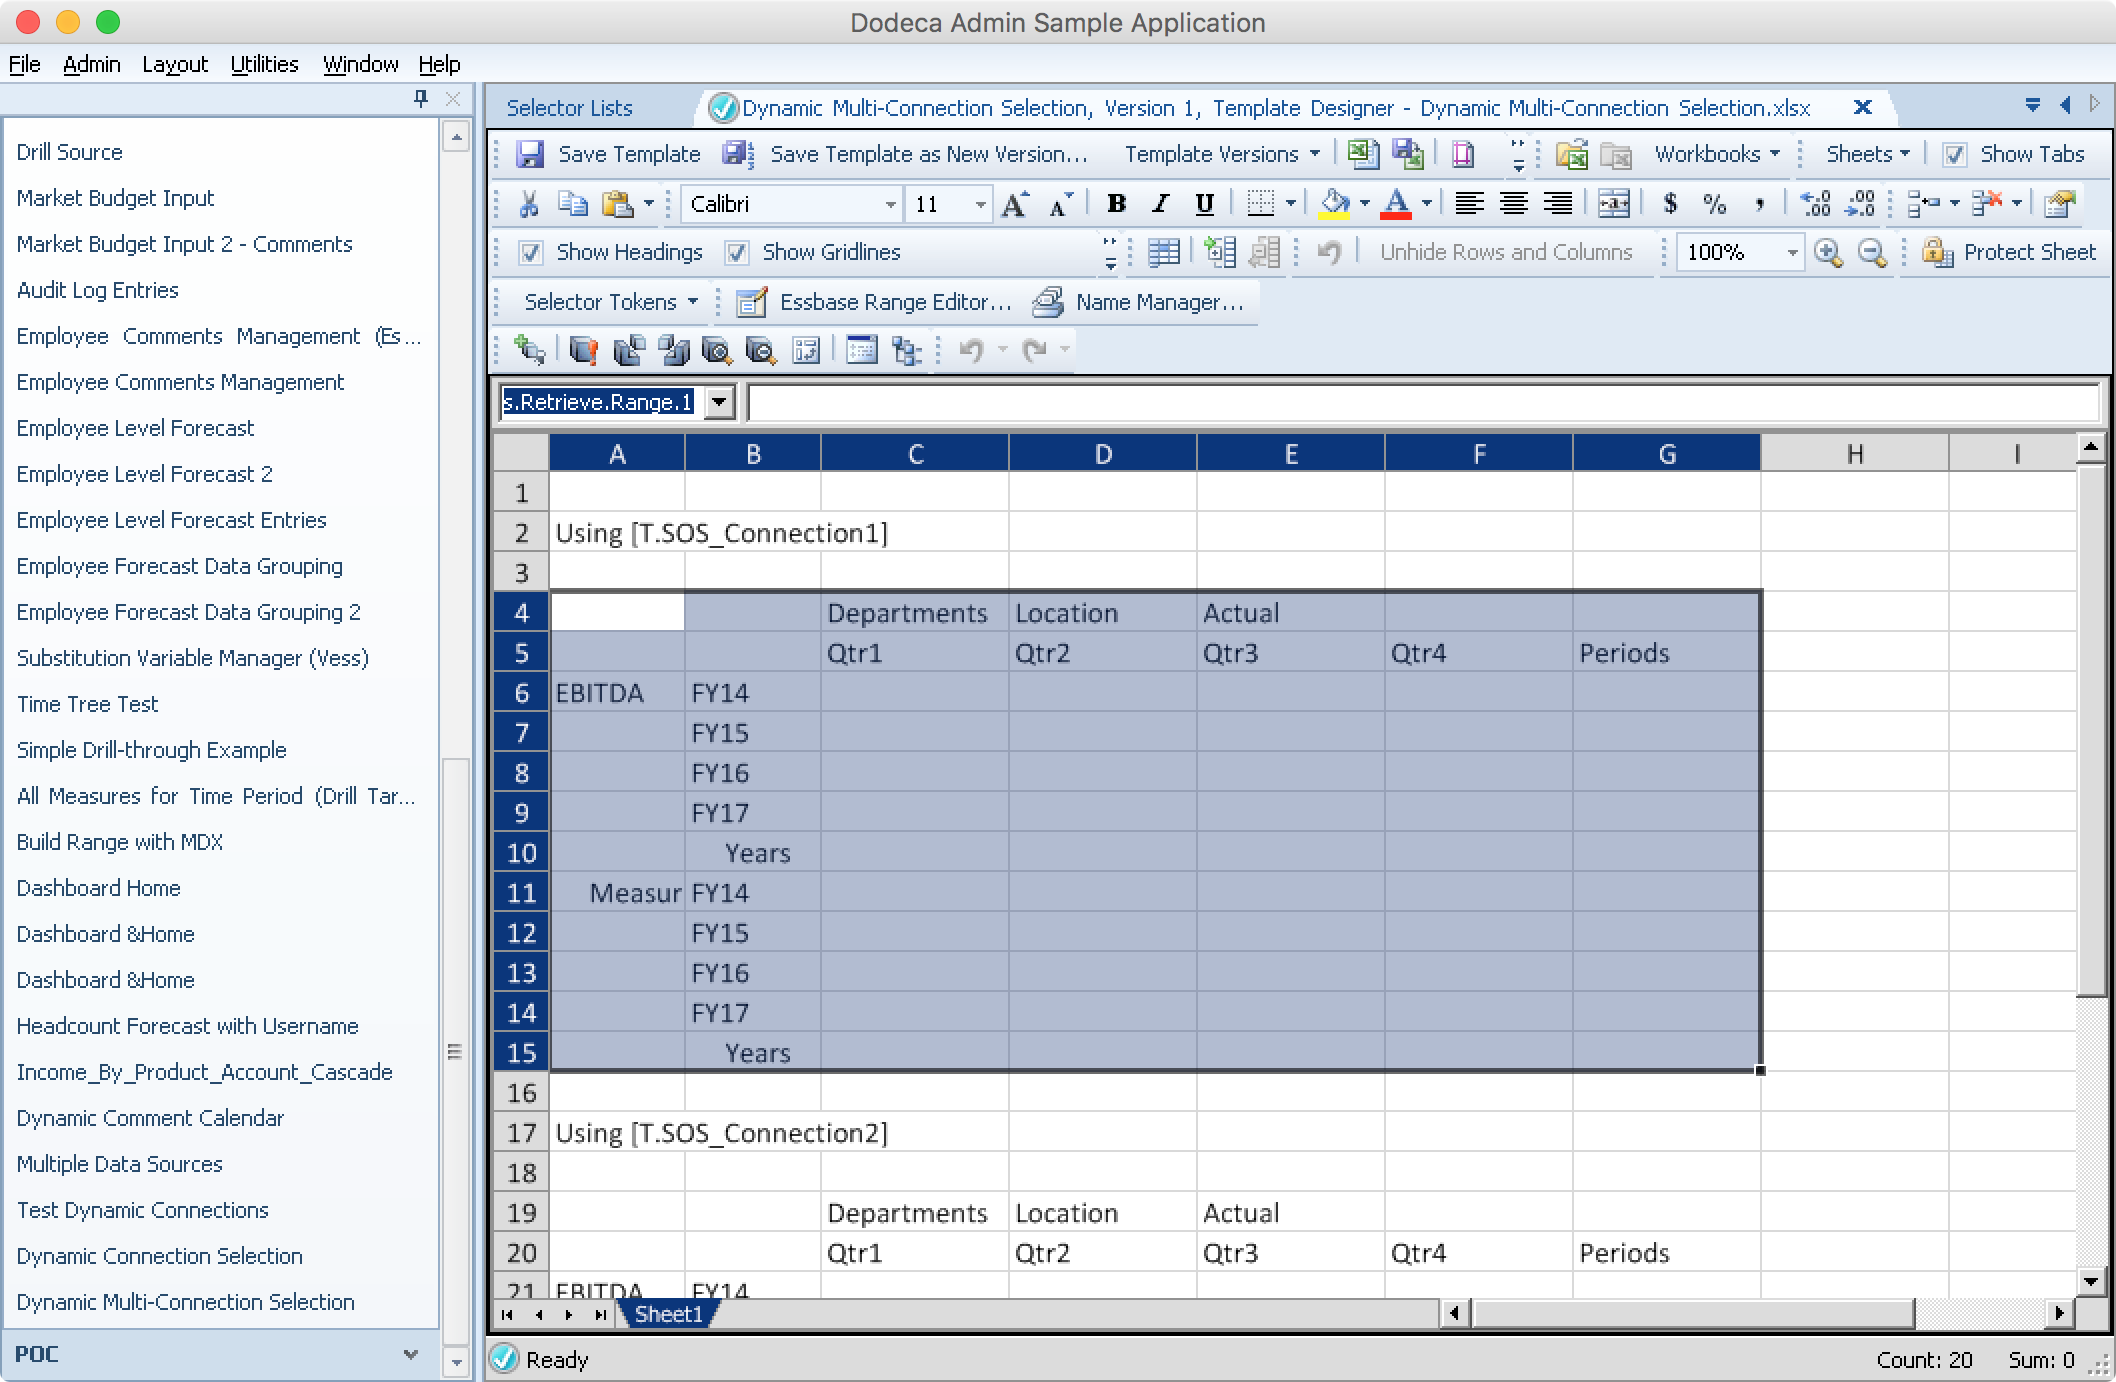
Highlighting the first retrieval range on our test view
Setting Named Ranges
Now I’m going to go make sure that my named ranges are perfectly dialed in. If this were a more typical Dodeca view then I make have just two named ranges, and then just define the connection to use on the view itself. But I need two more defined names in order to specify the proper connection for each retrieve range. Now for the “trick”: rather than the defined name referring to a specific Dodeca connection ID, it’s going to be defined as a formula that contains the token value from the proper selector:
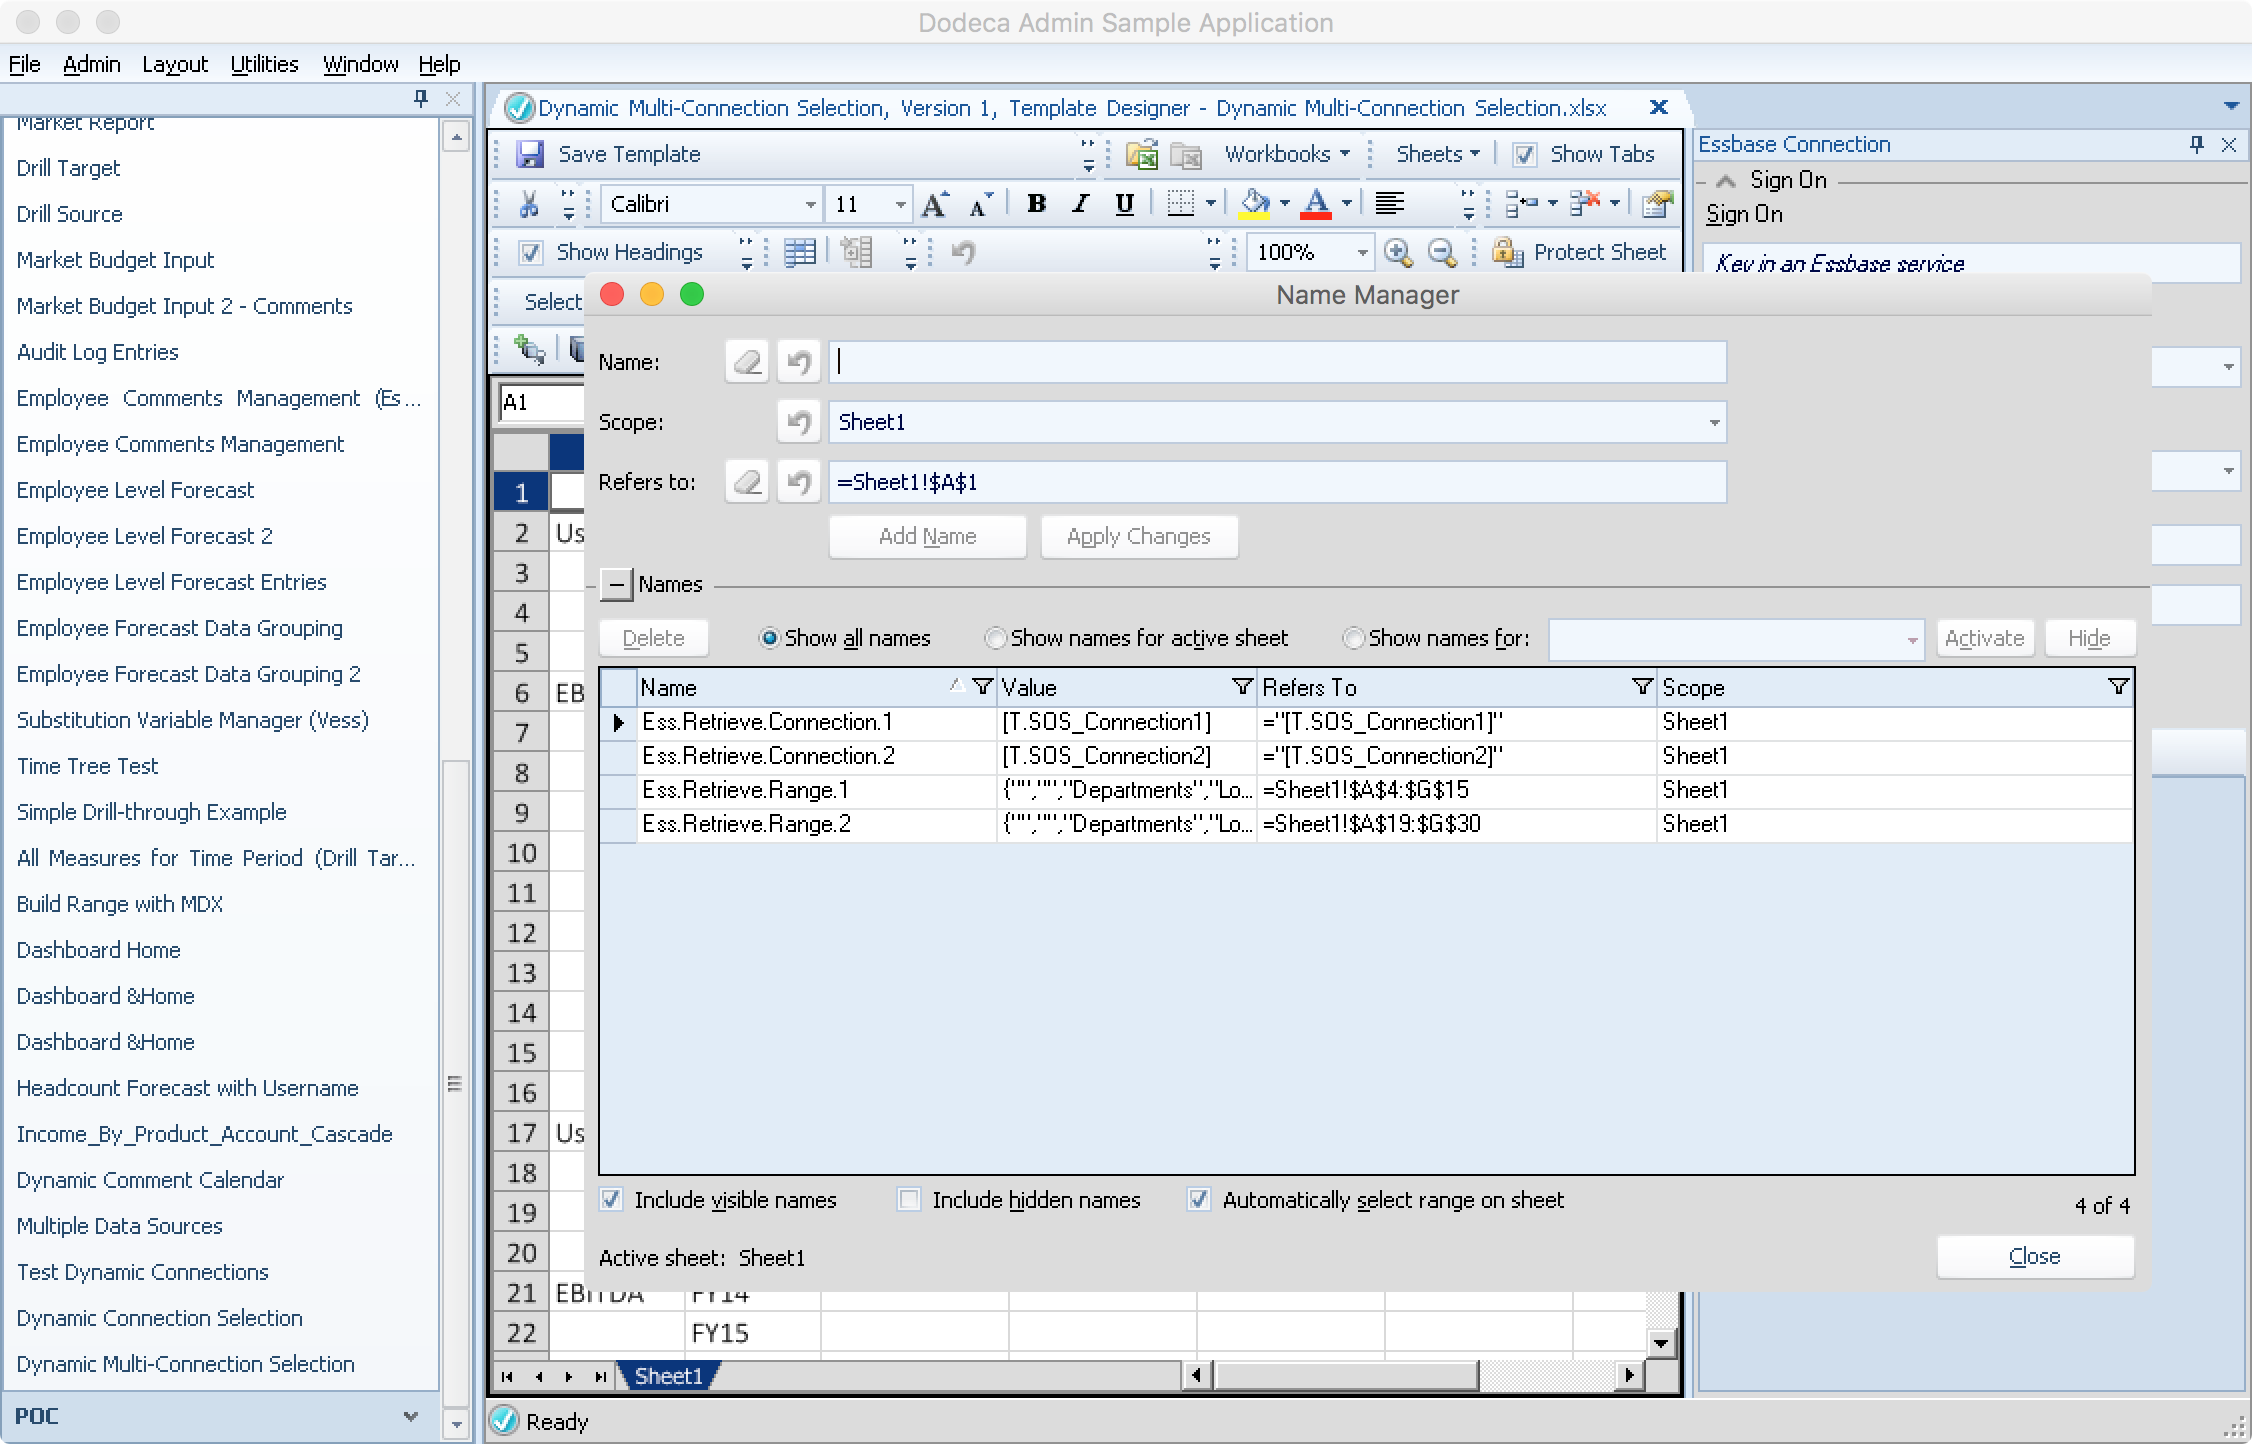
Editing the defined names in our template
Notice that my retrieval connection definitions refer are configured with the values of ="[T.SOS_Connection1]" and ="[T.SOS_Connection2]". For this dynamic multi-connection example, this is essentially the secret sauce. At view build time, these values will have the selector values plugged in and point to the proper connection.
Remaining View Properties
Now for just a few housekeeping items on the view configuration. One, let’s set the AutoBuildOnOpen value to true. Combined with the selector lists auto-populating with their most recent value, this means that if there happen to be recent selections (i.e. the user has opened and configured this view before), then when the view opens it will automatically build if it can. In the case that there aren’t recent selections (i.e. the user hasn’t opened the view before), then the view will just wait for selections to be made, then allow the user to build).
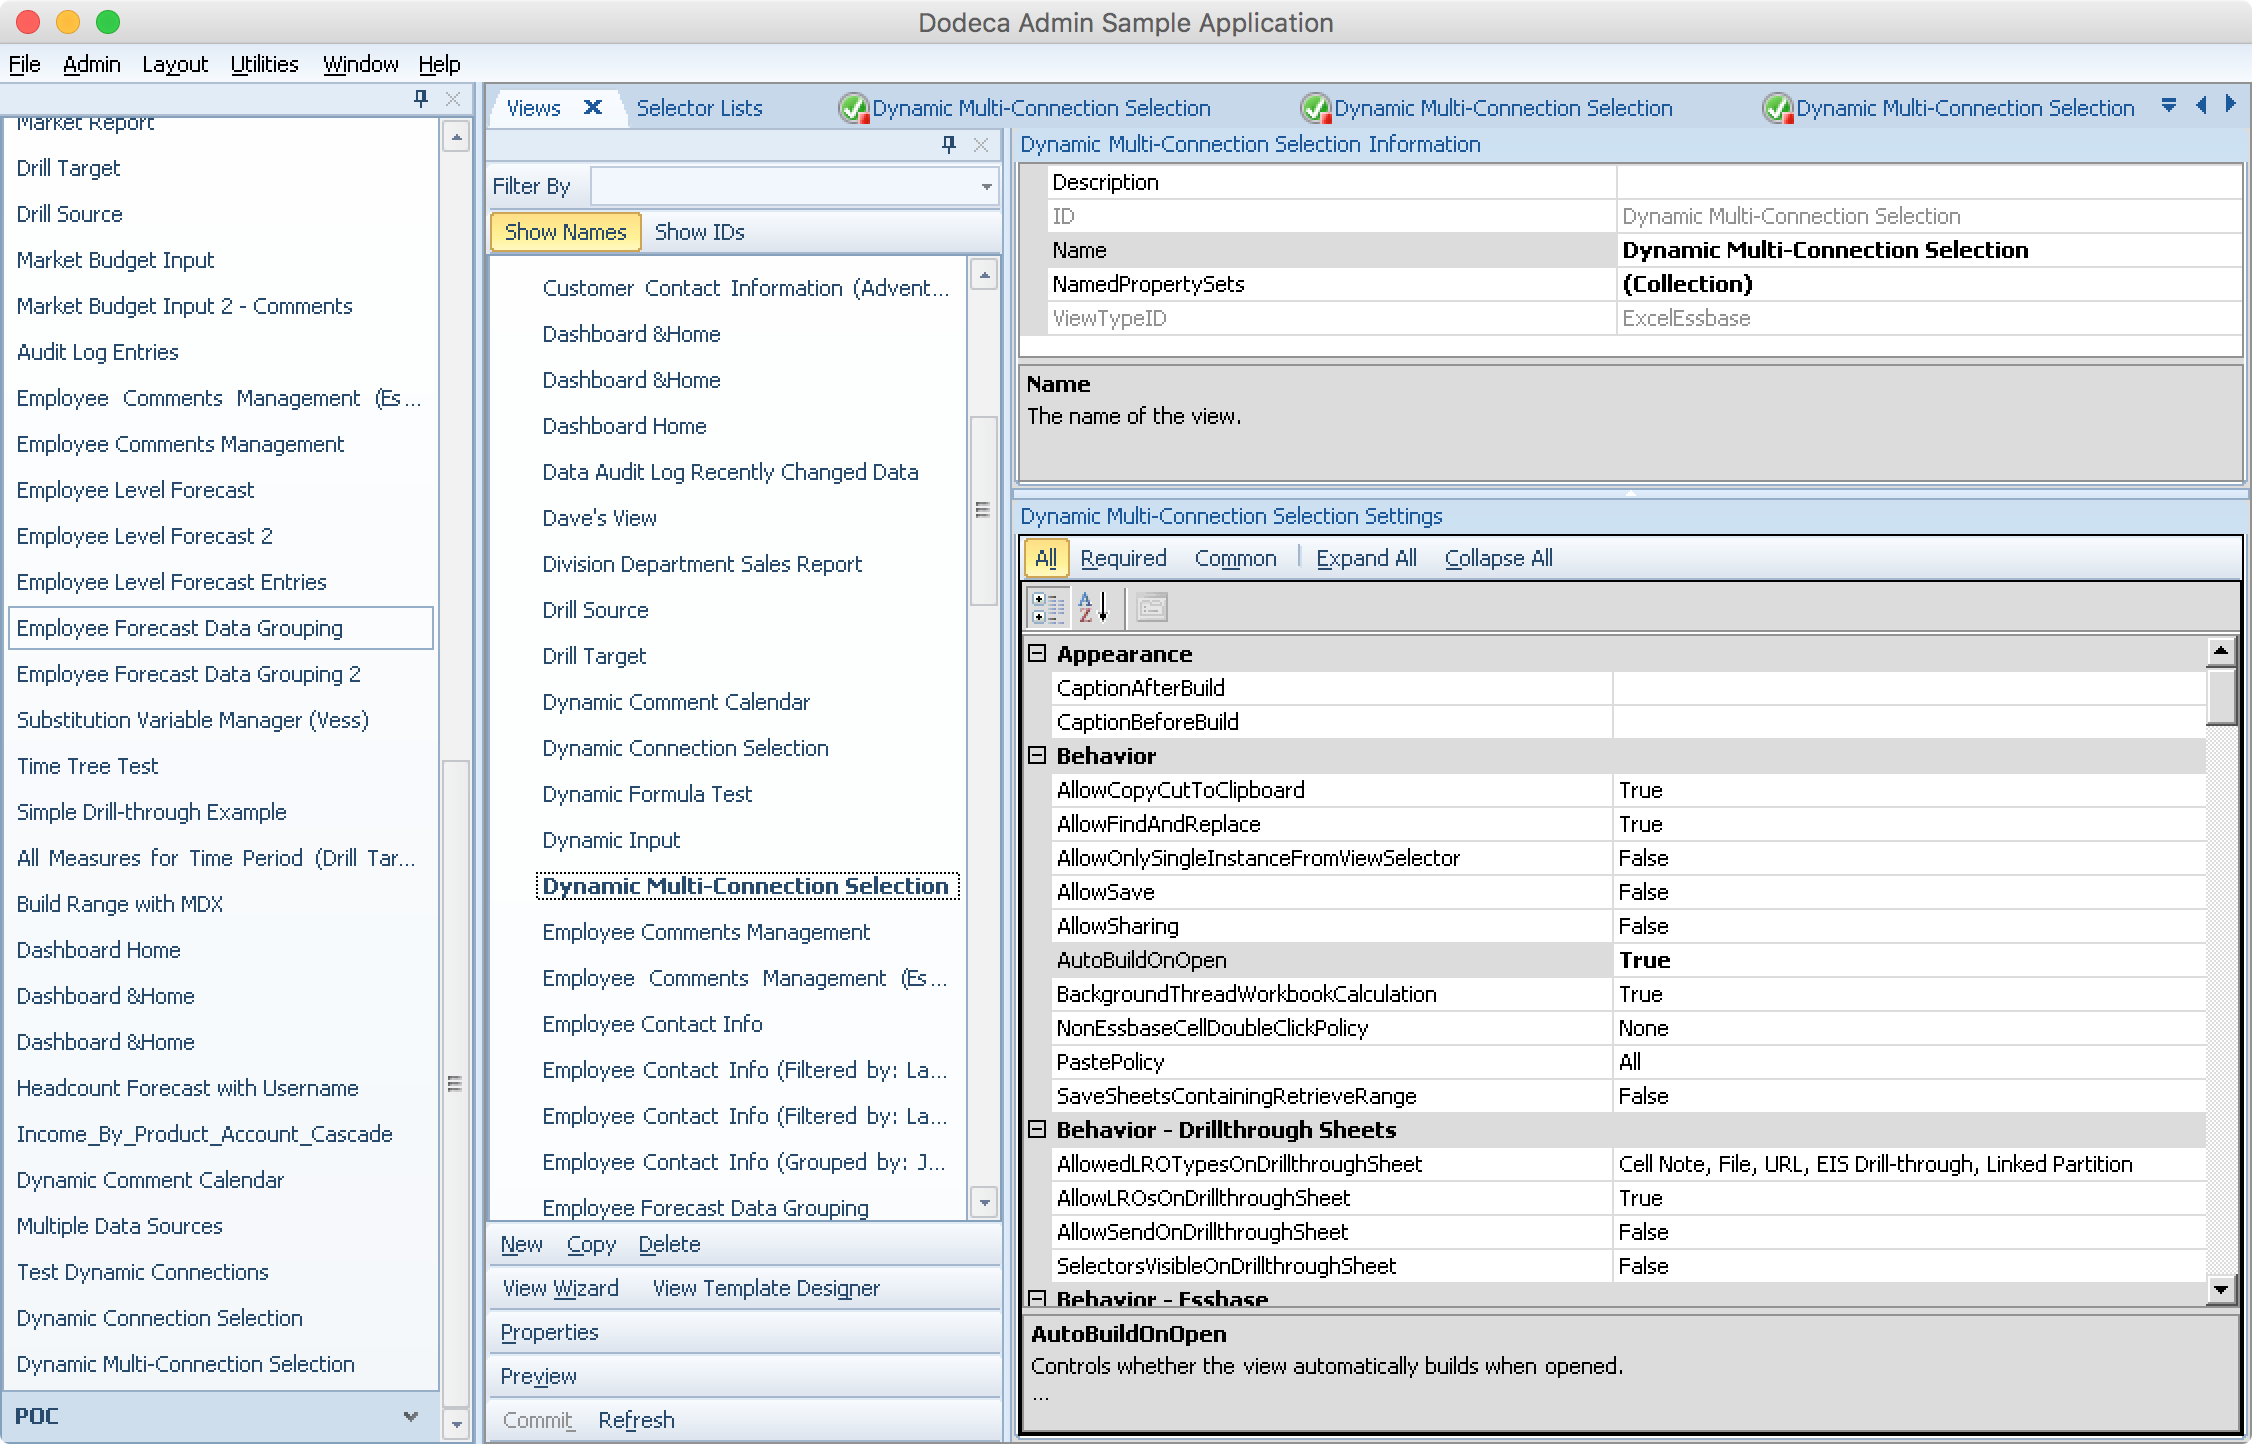
Setting the AutoBuildOnOpen value to True
As a remaining UI consideration, I want to set the selector list UI configuration to stacked. This is via the SelectorDockedControlGroupStyle setting (set to Stacked in the screenshot below). Combined with the Selector List settings from earlier, this means that when the view is opened, the selectors will automatically be shown, and we’ll see both at the same time (as opposed to having to select a tab to flip between them). As I mentioned, this makes the user experience just that much smoother, reducing the number of clicks necessary, especially for repetitive/additional uses of the view. Also notice in the following screenshot that I have my two selectors configured:
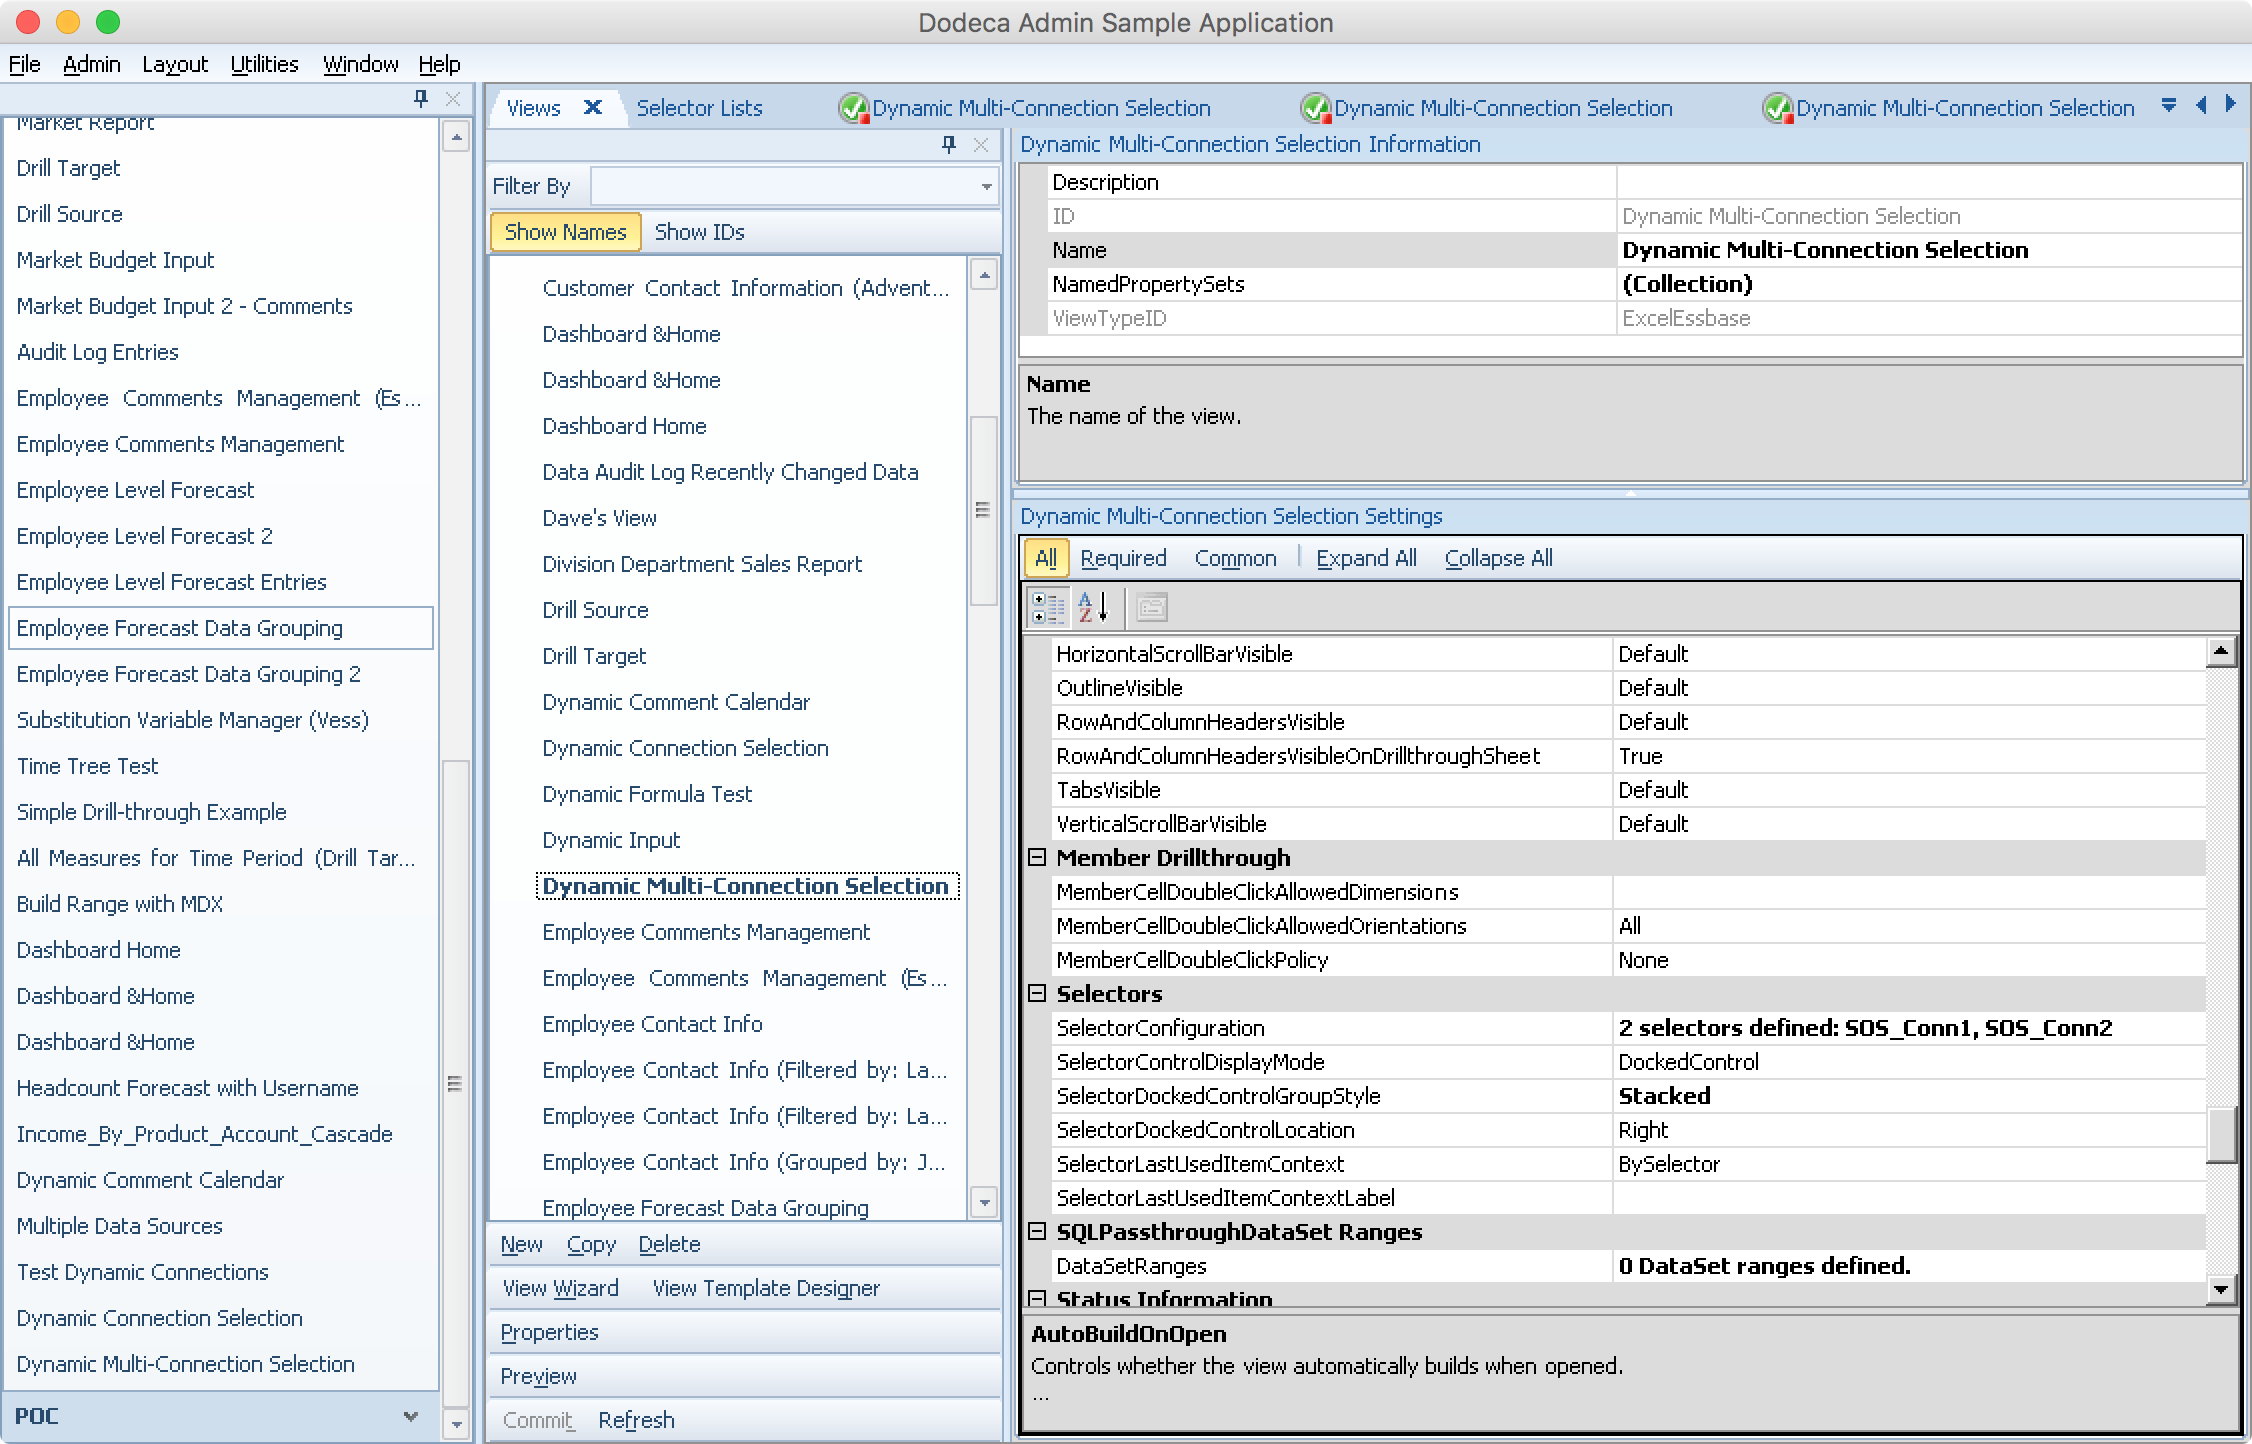
Setting the two selectors and their UI appearance (Stacked)
Tying It All Together
Alright, here we are at the end: we have our Essbase connections, selectors, selector lists, template, and view configuration all set exactly how we want it. Now we should be able to open the view, see the different connection choices presented automatically, and be able to build a view using those dynamic connection selections. For extra fun, I’m going to turn the auto build setting on (Auto on in the toolbar below), meaning that as soon as I click an option in either of the selectors, the view will rebuild using the current selections. And here we have it:
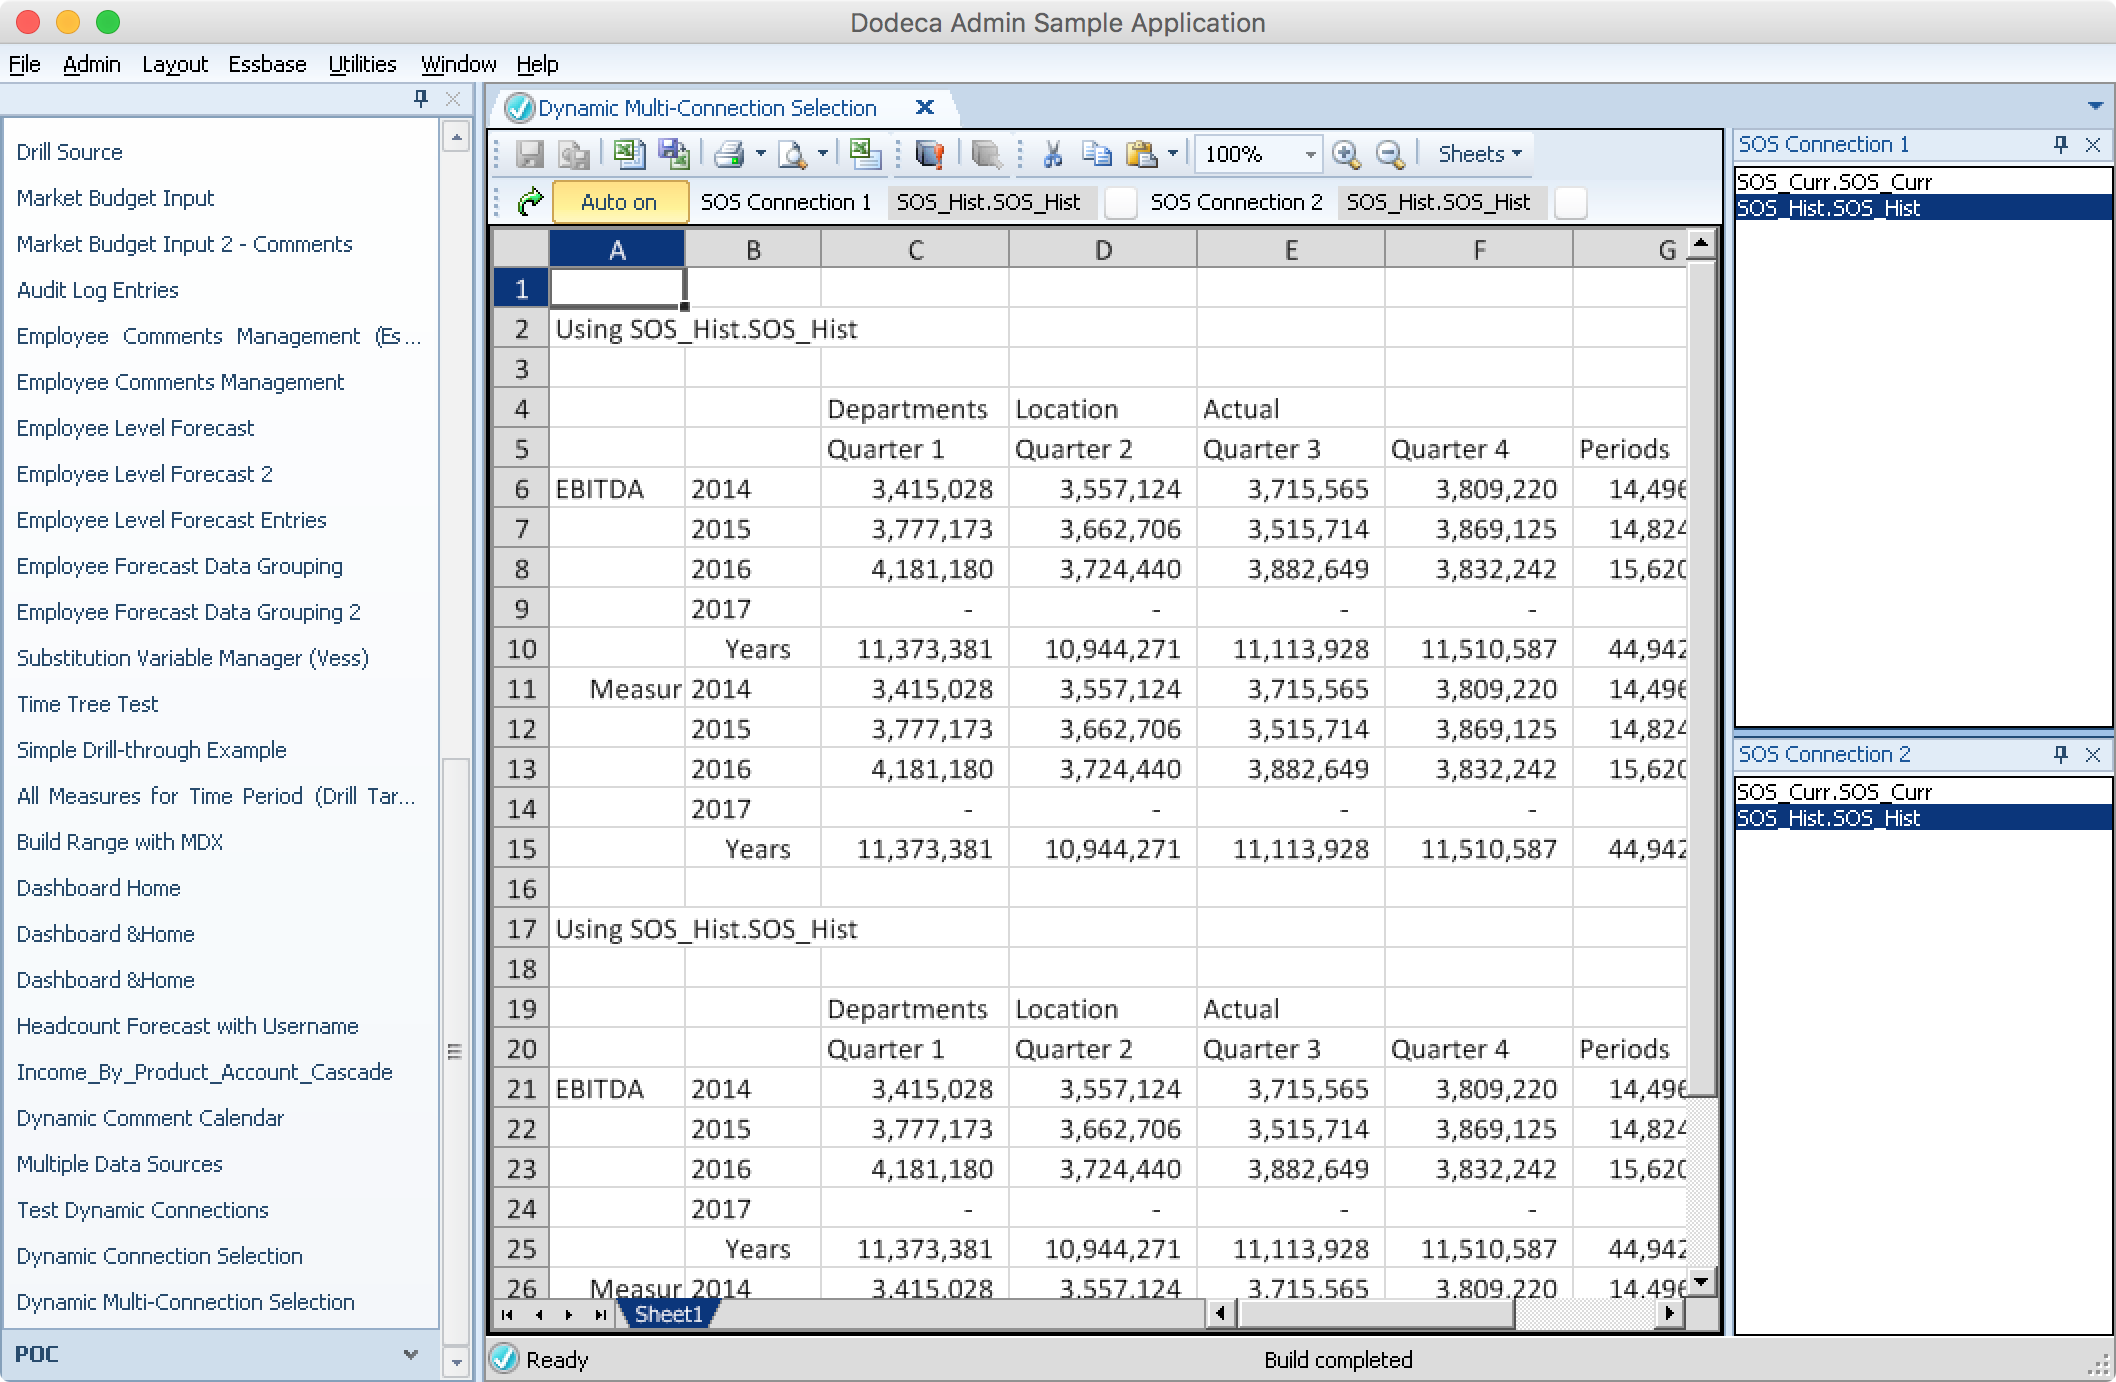
The final view, able to choose the connections dynamically and have the view auto build
You can see that the labels (rows 2 and 17 in the above screenshot) are dynamically updating based on the selection I’ve made. And sure enough, when I click on a different connection in one of the selector lists, the view rebuilds and uses that dynamic connection. Awesome.
I love this example so much. As I’ve said before and I’ll say again: Dodeca allows you to model your software and solutions after your business, rather than forcing you to model your business around software, which is exactly how it should be.